What You'll Do

  1. Create a GitHub account
  2. Download the website template
  3. Understand the files
  4. Customize your home page (index.html)
  5. Customize your portfolio page (portfolio.html)
  6. Upload your files to GitHub
  7. Turn on GitHub Pages (free hosting!)

🕐
Time needed: About 45–60 minutes, including uploading your own photos and videos to YouTube.
1
Create a GitHub Account

GitHub is a free platform for hosting code and websites. You'll use it to store your website files and publish them online — for free.
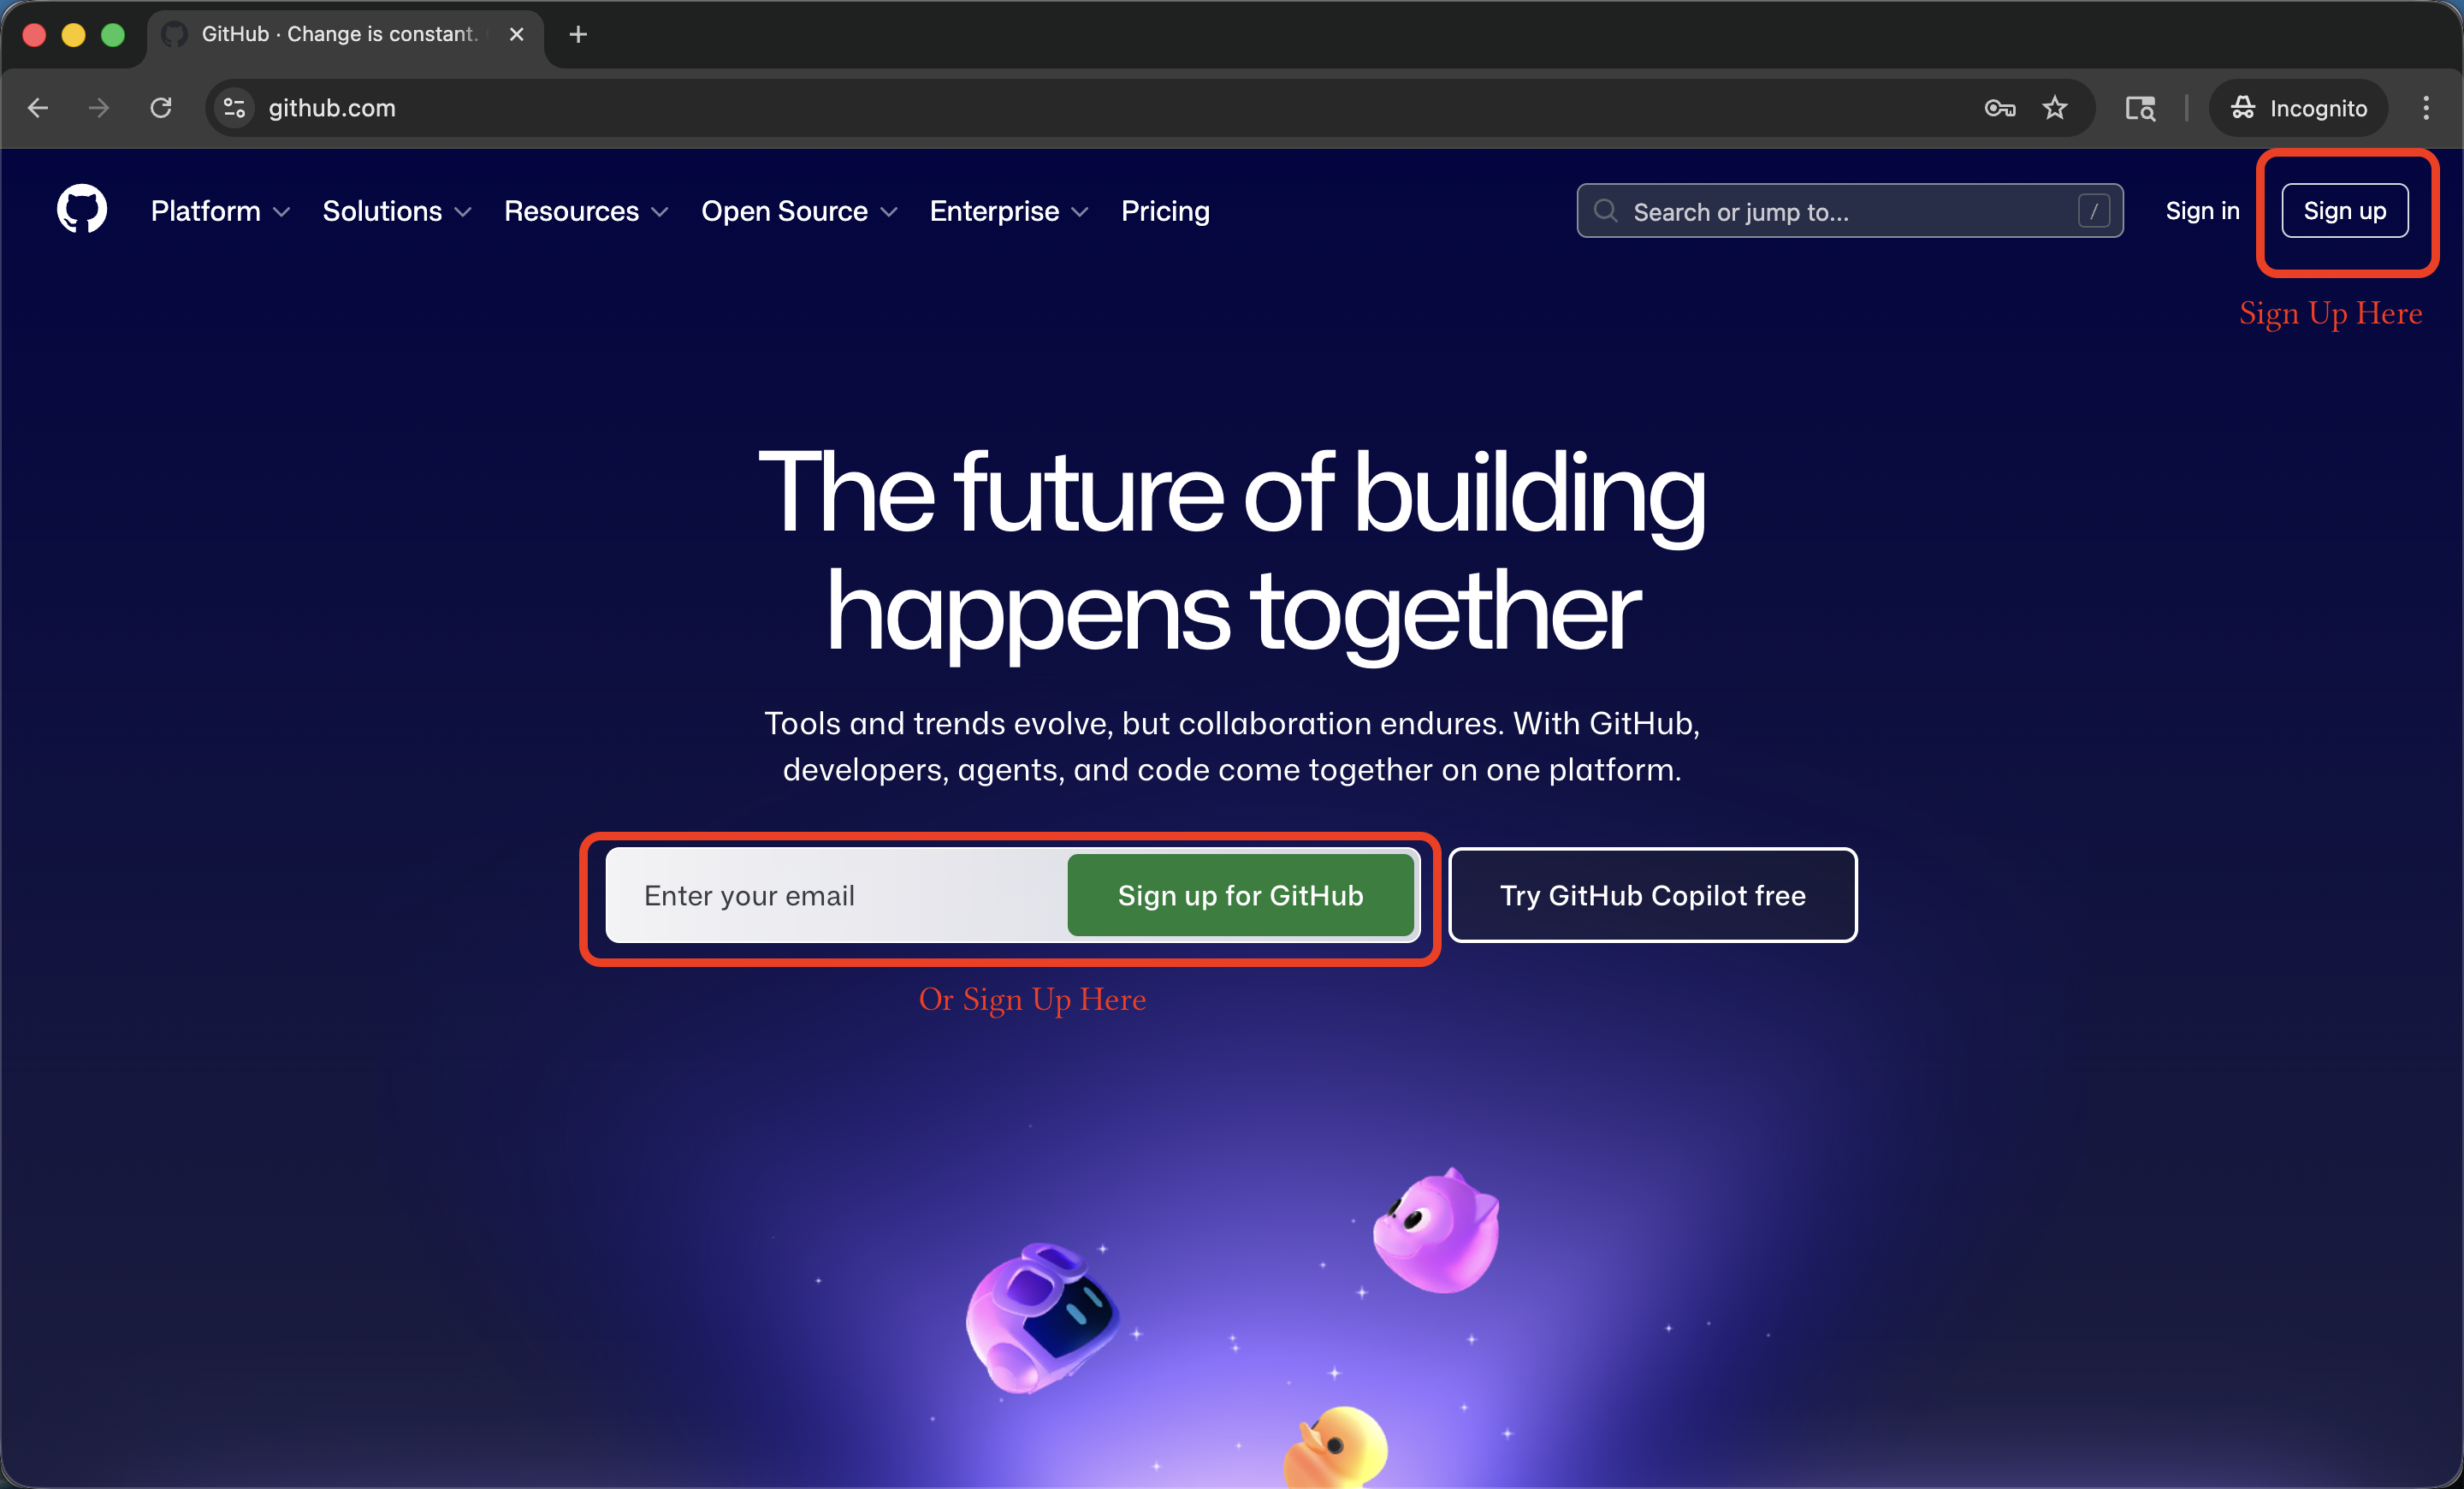
a
Go to github.com in your browser. Click the green "Sign up" button in the top-right corner.
The GitHub.com homepage with a large 'Sign up' button visible in the top-right corner and a 'Start a free trial' section in the middle.
b
Fill in your details: Enter your email address, create a password, and choose a username. Your username will appear in your website's URL (e.g., yourusername.github.io), so choose something professional like your name with no spaces or initials.
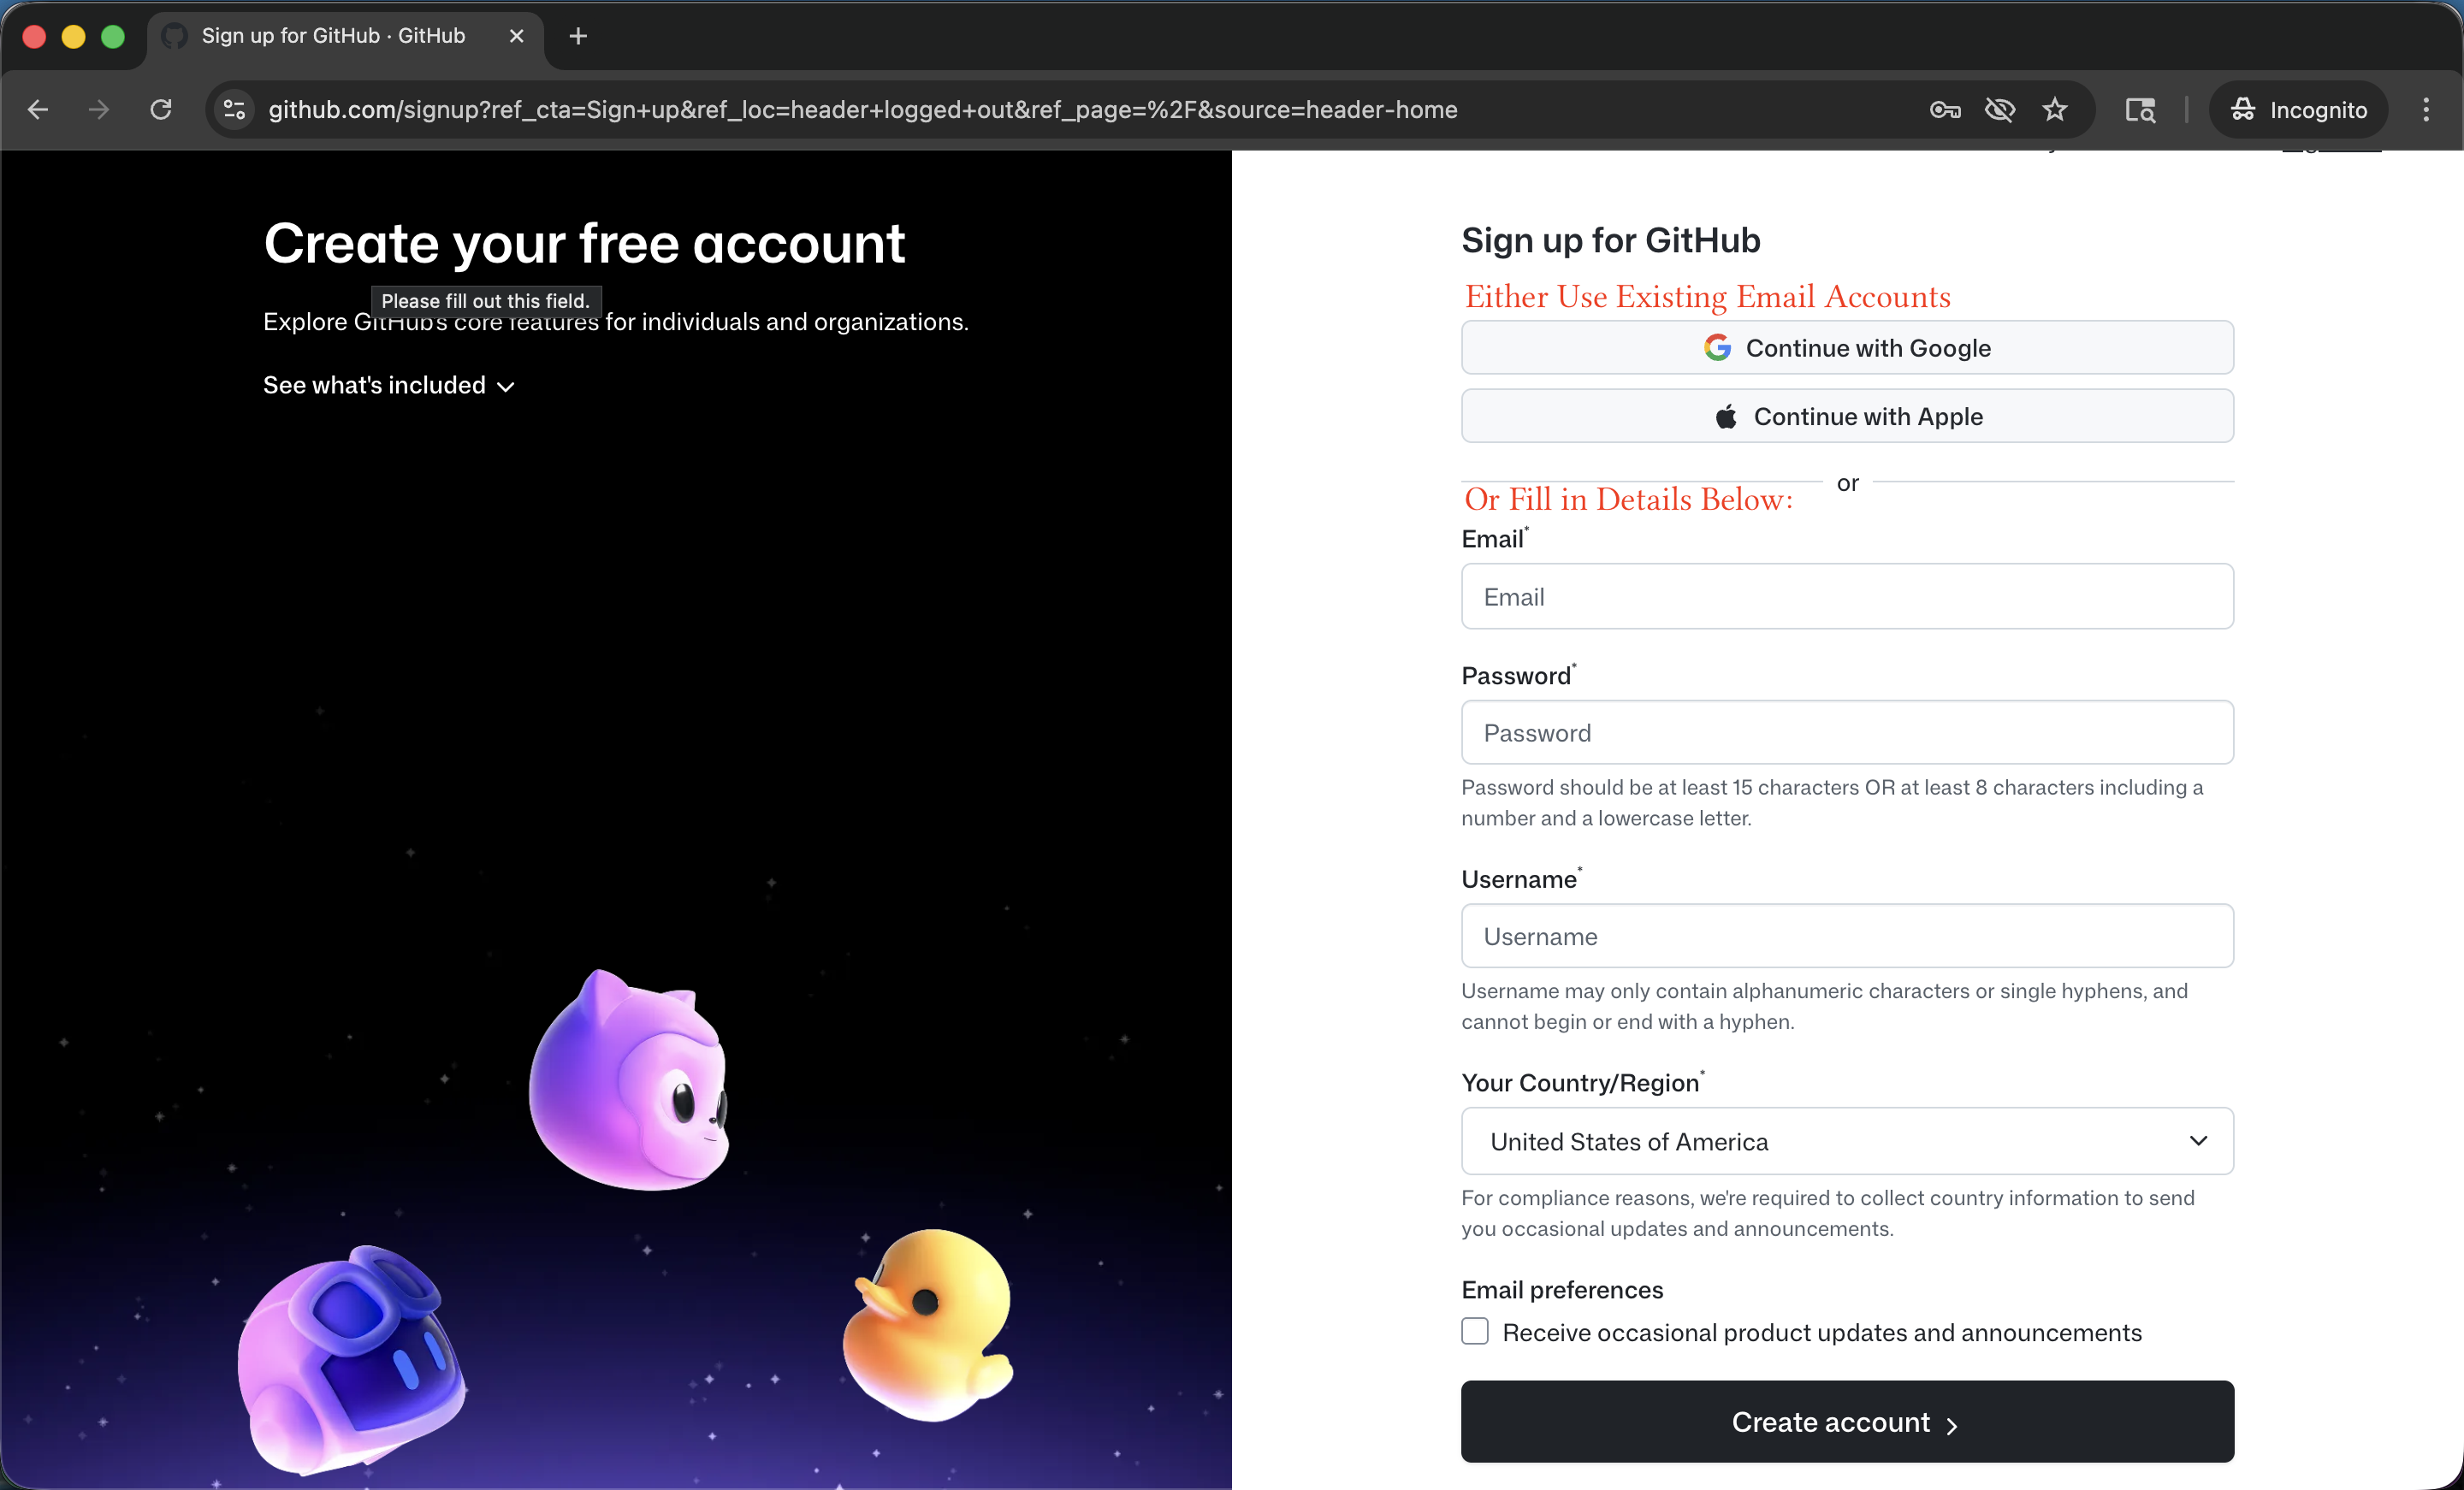
The sign-up page with fields for 'Enter your email', 'Create a password', and 'Enter a username'.
c
Complete the verification and click "Create account". GitHub will send a verification email — check your inbox and click the link to confirm your email address.

Once your email is verified, you're in! You'll see your GitHub dashboard.

2
Download the Website Template

We've prepared a ready-made template for you. You'll download it as a ZIP file and then edit it with your own content.
a
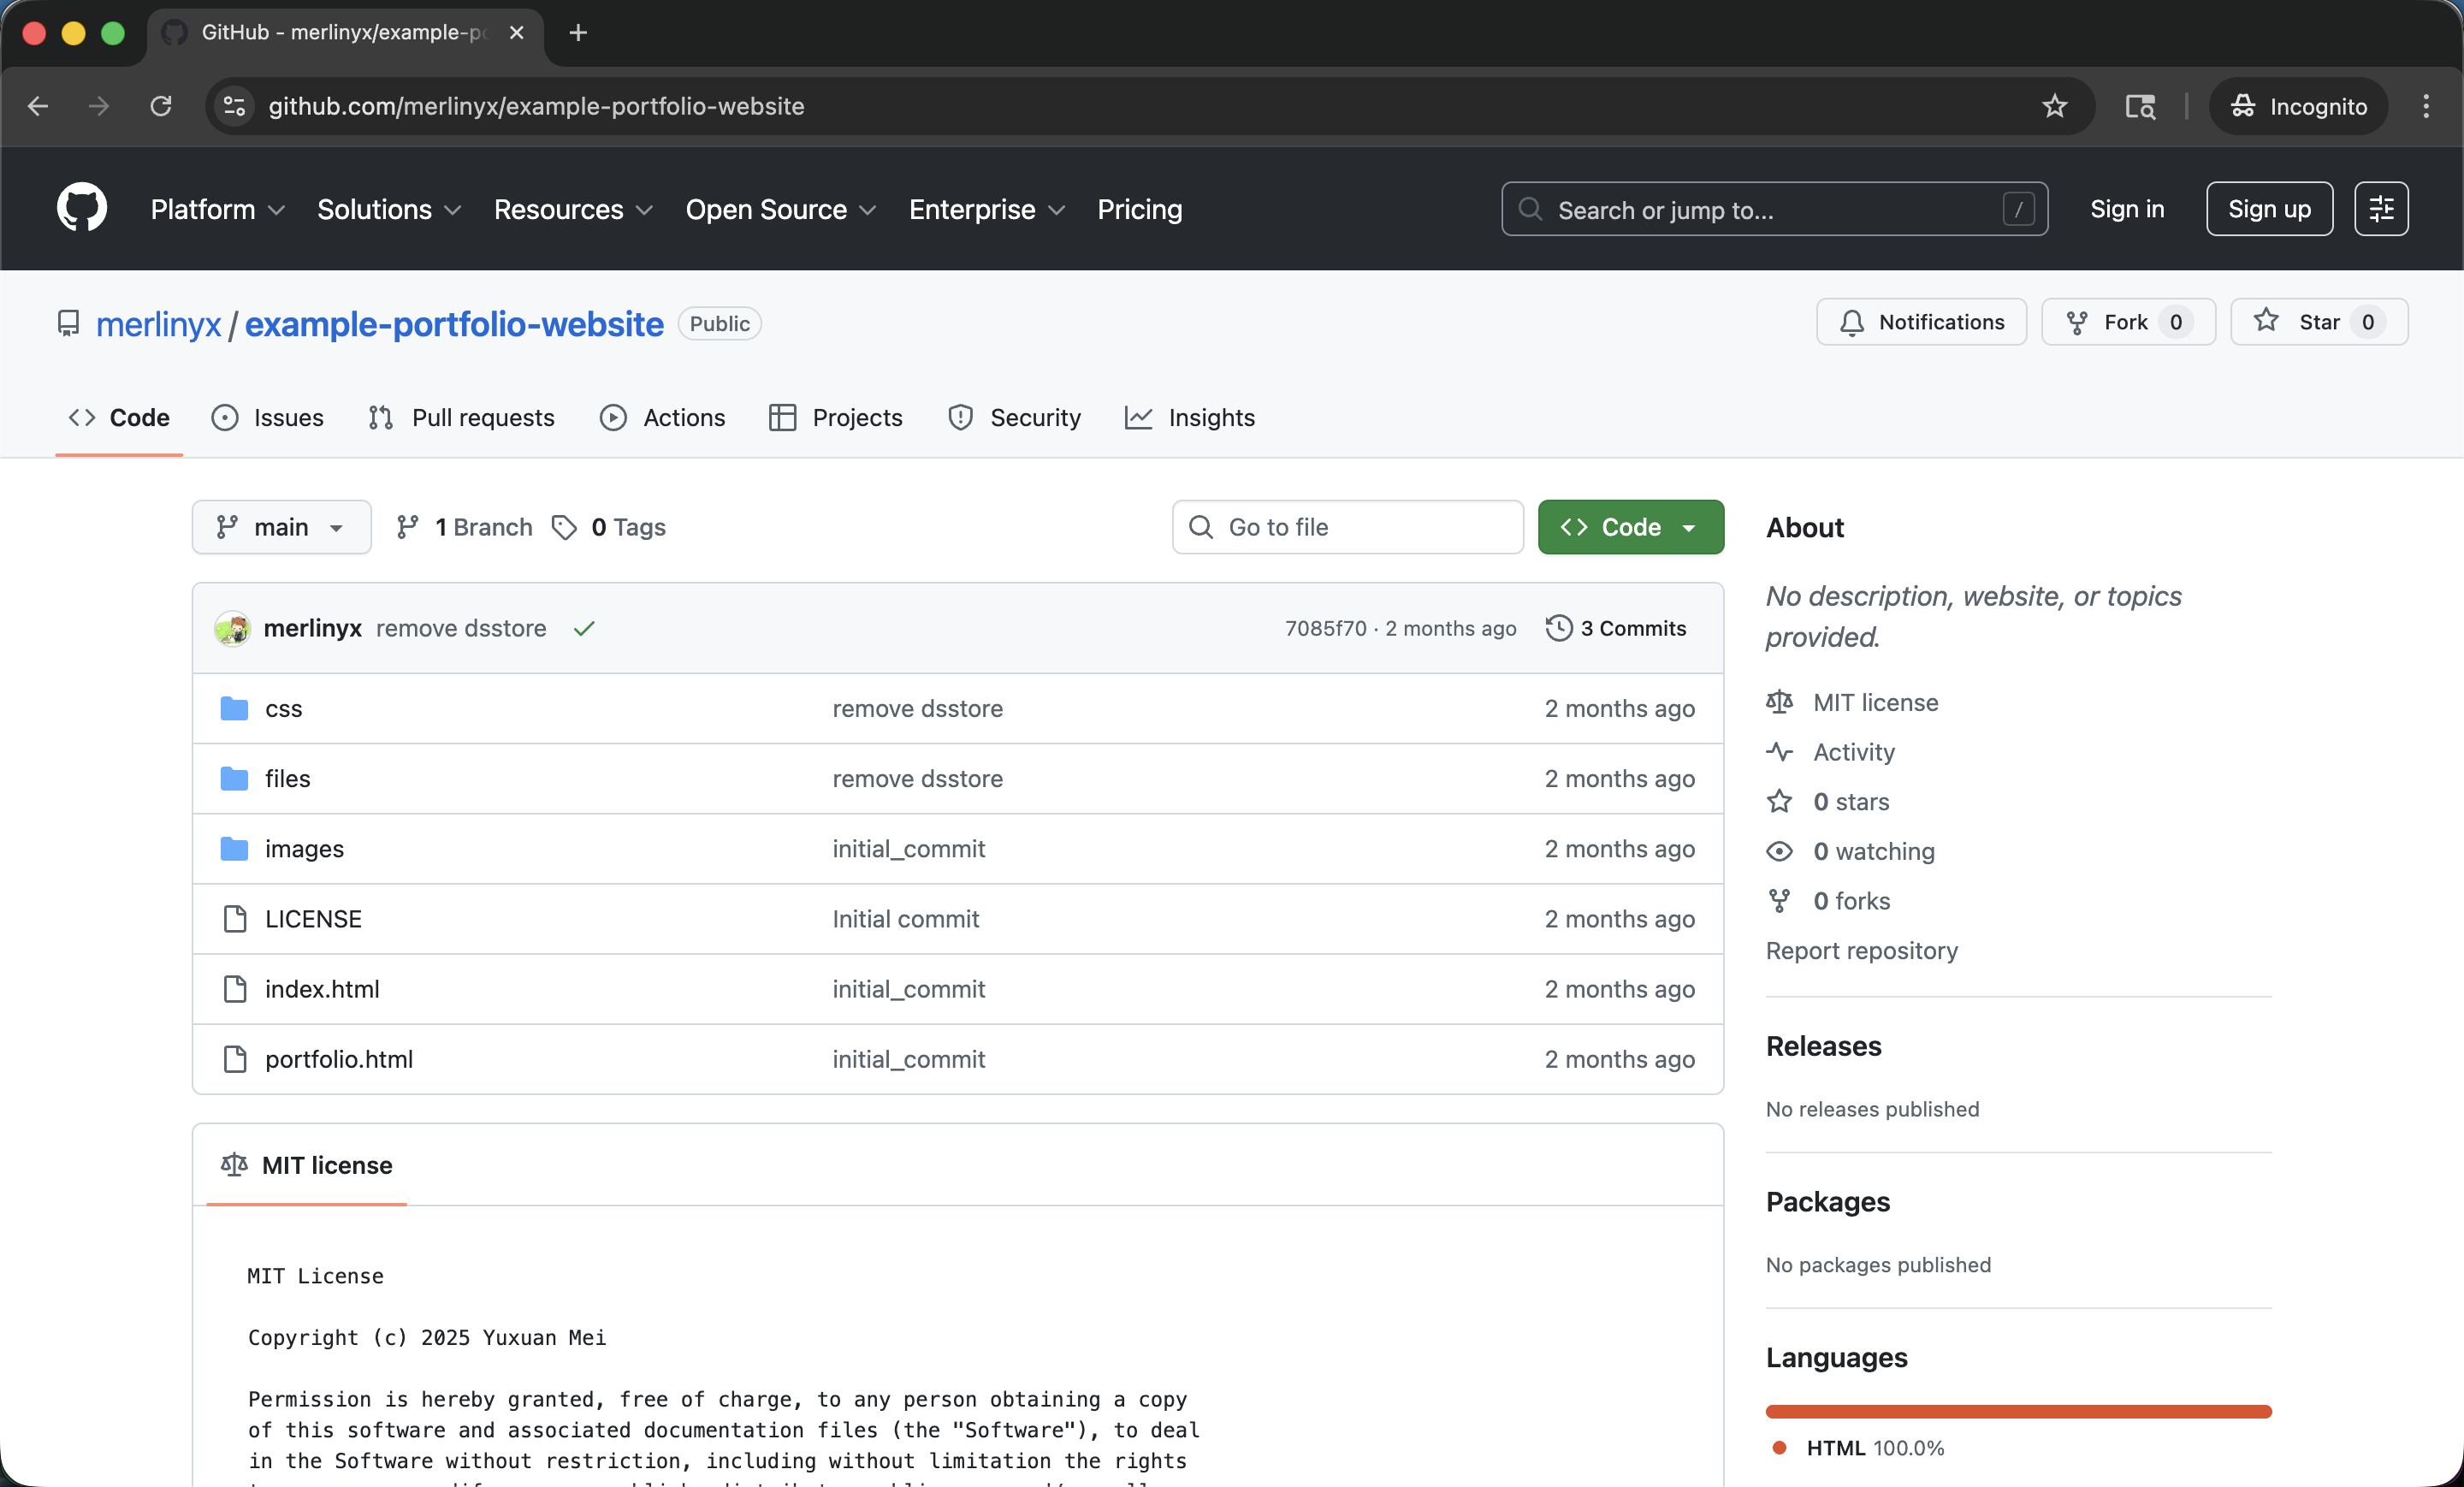
Go to the template repository: Visit github.com/merlinyx/example-portfolio-website
The template repository page showing files like 'index.html', 'portfolio.html', and folders like 'css/', 'images/', and 'files/'.
b
Click the green "<> Code" button (near the top-right of the file list). A small menu will appear.
c
Click "Download ZIP". A file called example-portfolio-website-main.zip will download to your computer (usually to your Downloads folder).
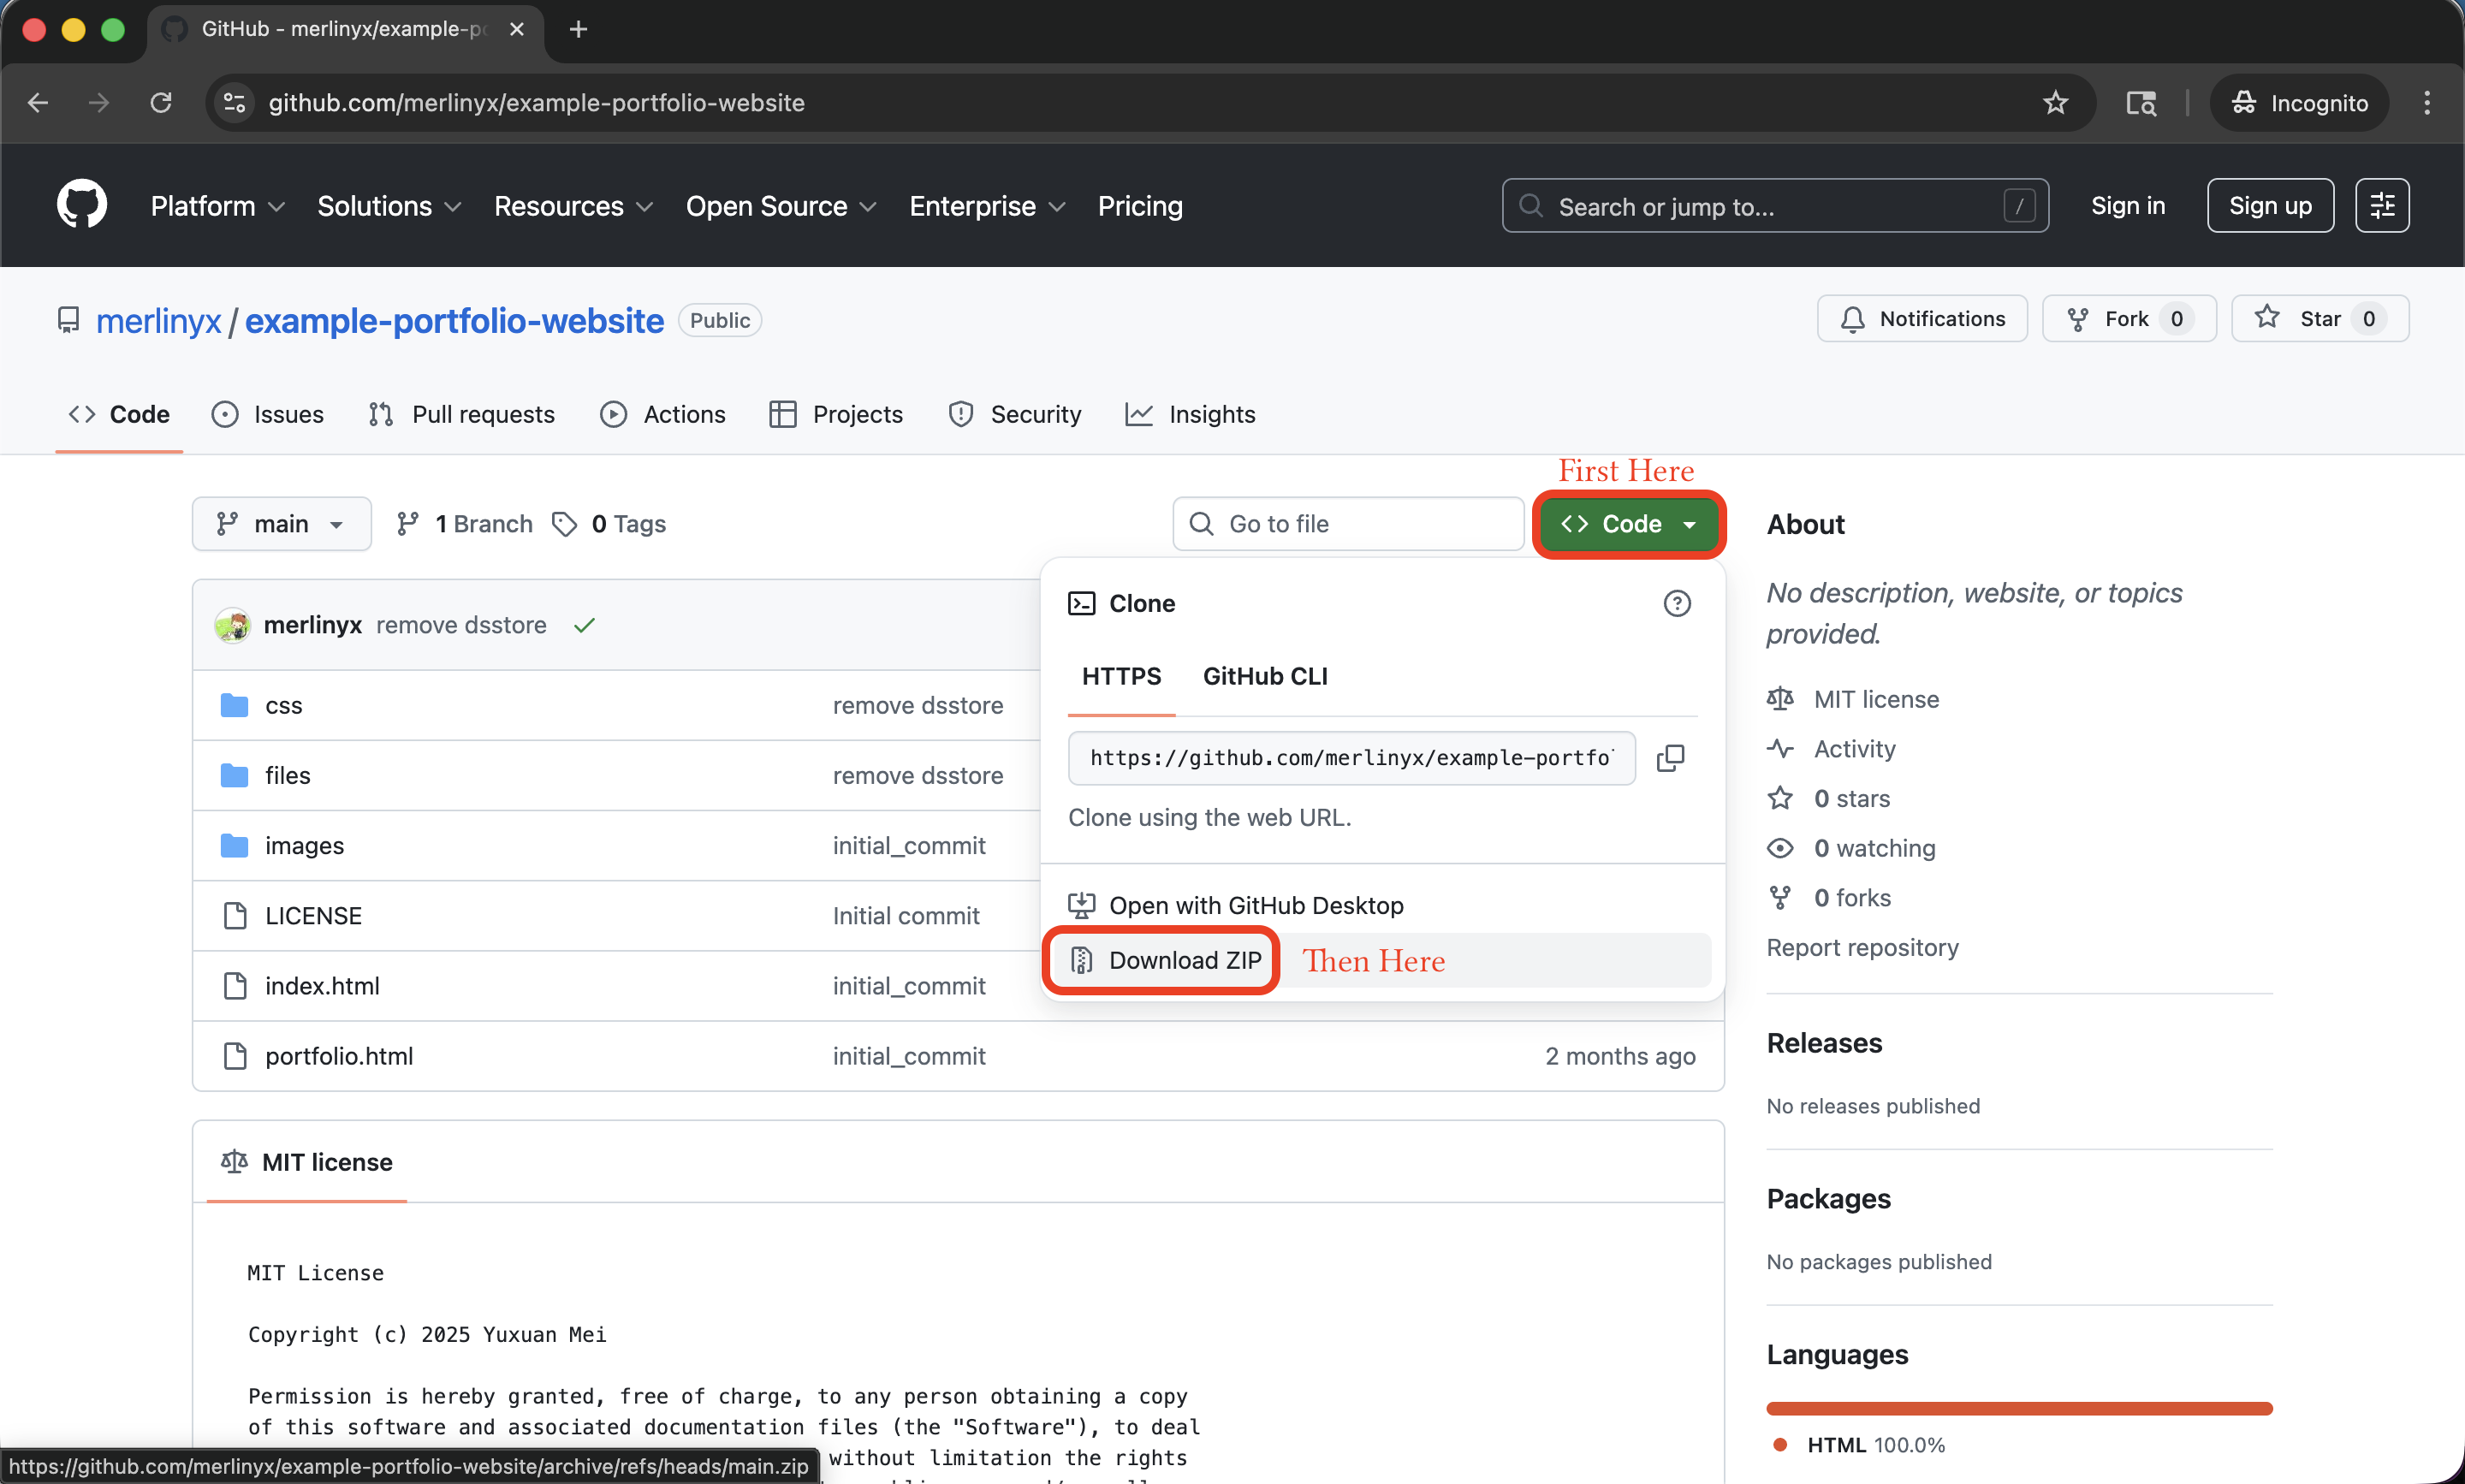
The green 'Code' button is clicked, showing a dropdown with options including 'Download ZIP' at the bottom.
d
Unzip (extract) the downloaded file.
  • Mac: Double-click the .zip file — it will automatically extract into a folder.
  • Windows: Right-click the .zip file → select "Extract All…" → click "Extract".
You should now have a folder called example-portfolio-website-main on your computer.
💡
Rename the folder: Rename this folder to something meaningful, like my-portfolio. This makes it easier to find later.
3
Understand the Files

Open the folder you just unzipped. Here's what each file and folder does:

📁 my-portfolio/
📄 index.html  ← Your home page (name, photo, bio, links)
📄 portfolio.html  ← Your portfolio page (images, videos)
📁 css/  ← Stylesheets — you don't need to touch these
📁 images/  ← Put your photos and images HERE
🖼 headshot.jpeg  ← Put your headshot photo here
🖼 design1.svg, 2layer.png, …  ← Replace with your project images
📁 files/  ← Put your PDF (CV/resume/etc.) HERE
📄 cv_template.pdf  ← Replace with your own files

The two files you'll be editing are highlighted in yellow: index.html and portfolio.html. Everything else either stays the same or you'll replace files in the images/ folder.

a
Preview the template. Double-click index.html in the folder to open it in your browser. You'll see the template homepage with placeholder content. Next, we will customize this page with your own content.
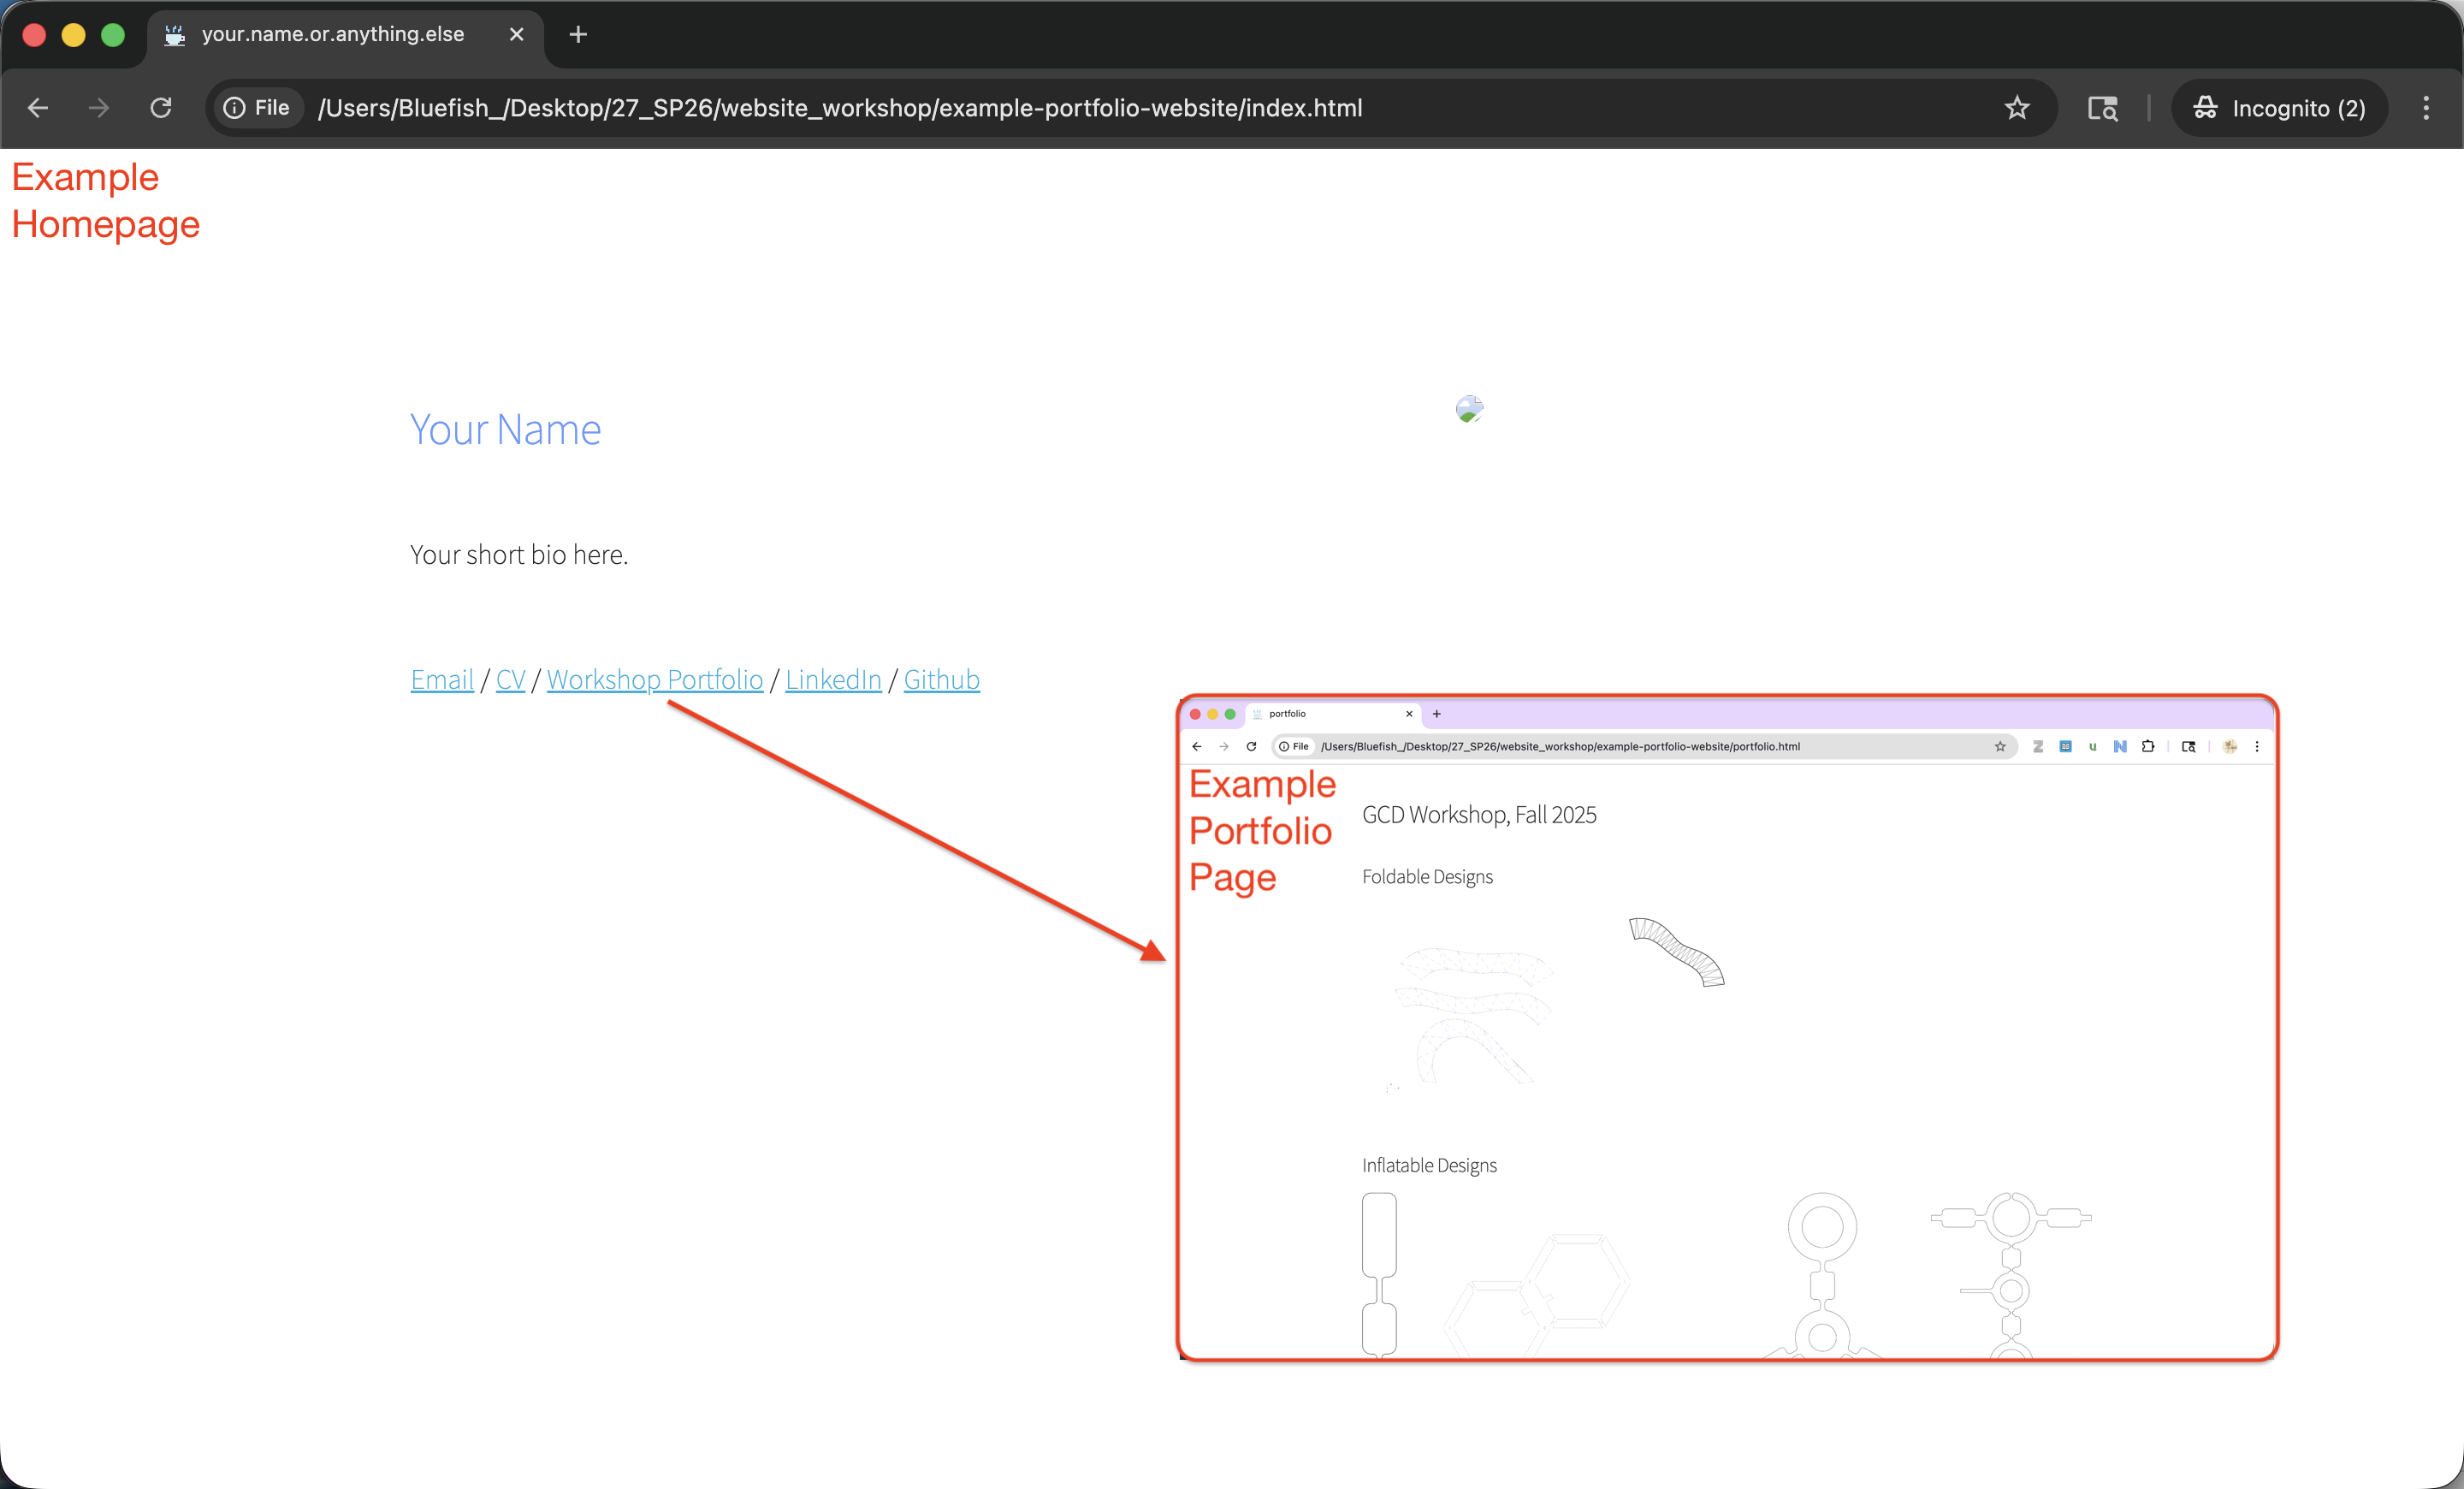
The template homepage open in a browser, showing placeholder content including a name, headshot photo, bio text, and links.
🔧
What tool to use to edit HTML files? You can use any plain-text editor. If you don't have one, download something like Visual Studio Code (VS Code) or Sublime Text. These are free, easy to use, and highlight your code in colors to help you read it. Don't use Microsoft Word to edit HTML files! Notepad and TextEdit are okay but they don't highlight the html code so it might be harder to parse.
4
Customize Your Home Page (index.html)

Open index.html in VS Code (or your text editor). You'll edit several parts of this file. The parts you need to change are marked with comments in the code — look for lines that say <!-- EDIT: ... -->.

a
Change the page title and your name Find these lines near the top of the file and replace the placeholder text:
index.html — near the top (lines ~5 and ~19) <title>your.name.or.anything.else</title> <!-- change to e.g.: Jane Doe --> ... <h1>Your Name</h1> <!-- change to your actual name -->
b
Replace your headshot photo Take a clear, professional-looking photo of yourself (it will appear as a circular crop). Save it as headshot.jpeg and place it in the images/ folder, replacing the existing file with the same name.
💡
Photo tip: A square photo with your face centered works best. File size under 2 MB is recommended. Name it exactly headshot.jpeg (all lowercase) — the capitalization matters.

The HTML already points to this image — you don't need to edit anything in the code for this part:

index.html — image tag (no change needed if you named it headshot.jpeg) <!-- already correct if you saved as headshot.jpeg -->
<img src="images/headshot.jpeg" ... />
c
Write your bio. Find this line and replace it with 2–4 sentences about yourself — your program, interests, what you make, etc.:
index.html — bio section <p>Your short bio here.</p>
<!-- Example: -->
<p>I'm a fourth-year IDEAS major at Wesleyan University. I love making soft robotic structures and exploring how physical objects can move and respond to their environment.</p>
d
Update your links. Find the links section and fill in your own information:
index.html — links section <!-- Email -->
<a href="mailto:your.email@example.com">Email</a>
<!-- LinkedIn (or remove this link if you don't have one) -->
<a href="https://www.linkedin.com/in/your-profile">LinkedIn</a>
<!-- GitHub (update after you create your repo in Step 6) -->
<a href="https://github.com/your-github">GitHub</a>
ℹ️
No LinkedIn or GitHub yet? You can remove those links entirely by deleting the corresponding <a> line. Come back and add them later once you've set them up.
e
Add your CV / Resume (optional) If you have a CV or resume as a PDF:
  • Rename your PDF file to cv.pdf (or keep it as cv_template.pdf)
  • Replace the existing file in the files/ folder with your own
  • If you renamed it, update the link in index.html:
index.html — CV link <a href="files/cv_template.pdf">CV</a>
<!-- Change cv_template.pdf to match your file name, e.g.: my_cv.pdf -->
💡
Save your changes! After editing, press Cmd+S (Mac) or Ctrl+S (Windows) to save. You can preview your edits by opening index.html directly in a browser (just double-click the file).
5
Customize Your Portfolio Page (portfolio.html)

This is where you show off your work! Open portfolio.html in your text editor.

a
Update the title and subtitle. Near the top of portfolio.html, change the course/project name to match your own:
portfolio.html — header
<h1>GCD Workshop, Fall 2025</h1>
<!-- Change the title, e.g.: THEA 383, Spring 2025 -->
<h2>Foldable Designs</h2>
<!-- Change the subtitles, e.g.: Wearable Prototypes -->
b
Add your own images. Copy your project images (photos, renderings, scans, etc.) into the images/ folder. Then update the src attributes in portfolio.html to point to your files:
ℹ️
Supported image formats: .jpg / .jpeg, .png, .svg, .gif, and .webp all work in web browsers. Keep individual images under 5 MB (ideally 1~2 MB) for faster uploading and also loading of your page.
portfolio.html — image rows (update the filenames and column sizes) <div class="row">
<div class="four columns"><img class="u-max-full-width" src="images/design1.svg"/></div>
<div class="seven columns"><img class="u-max-full-width" src="images/kreslingN20.svg"/></div>
</div>

The template uses a 12-column grid (from Skeleton CSS). Each image sits inside a <div> with a column width, and images in the same <div class="row"> appear side by side. The column widths in a row should add up to 12 or fewer. Available sizes: one through twelve.

⚠️
File names are case-sensitive! If your image is named MyPhoto.JPG, it won't work if your code says myphoto.jpg. We recommend keeping all file names lowercase with no spaces — use underscores instead (e.g., my_photo.jpg).

To add more images, add a new column <div> inside an existing row, or create a new row:

portfolio.html — adding a new image in a new row
<!-- Copy this block and paste it below an existing row, then change the filename and column size -->
<div class="row">
<div class="six columns"><img class="u-max-full-width" src="images/your_new_image.jpg"/></div>
</div>

To remove an image, delete its entire <div class="… columns"> block. If that was the only image in the row, delete the whole <div class="row">...</div> block.

c
Add your videos via YouTube Videos can be large files, so instead of uploading them directly, we embed them from YouTube. Here's how:
1
Upload your video to YouTube. Go to youtube.com, sign in, and click the camera+ icon (top-right) → "Upload video". Follow the steps to upload. You can set the video to "Unlisted" so only people with the link can see it.
2
Copy your video's ID from the YouTube URL. Once uploaded, go to your video. Look at the browser address bar — the URL looks like:
https://www.youtube.com/watch?v=tSygNXkDcCU
The part after v= is your video ID (e.g., tSygNXkDcCU).
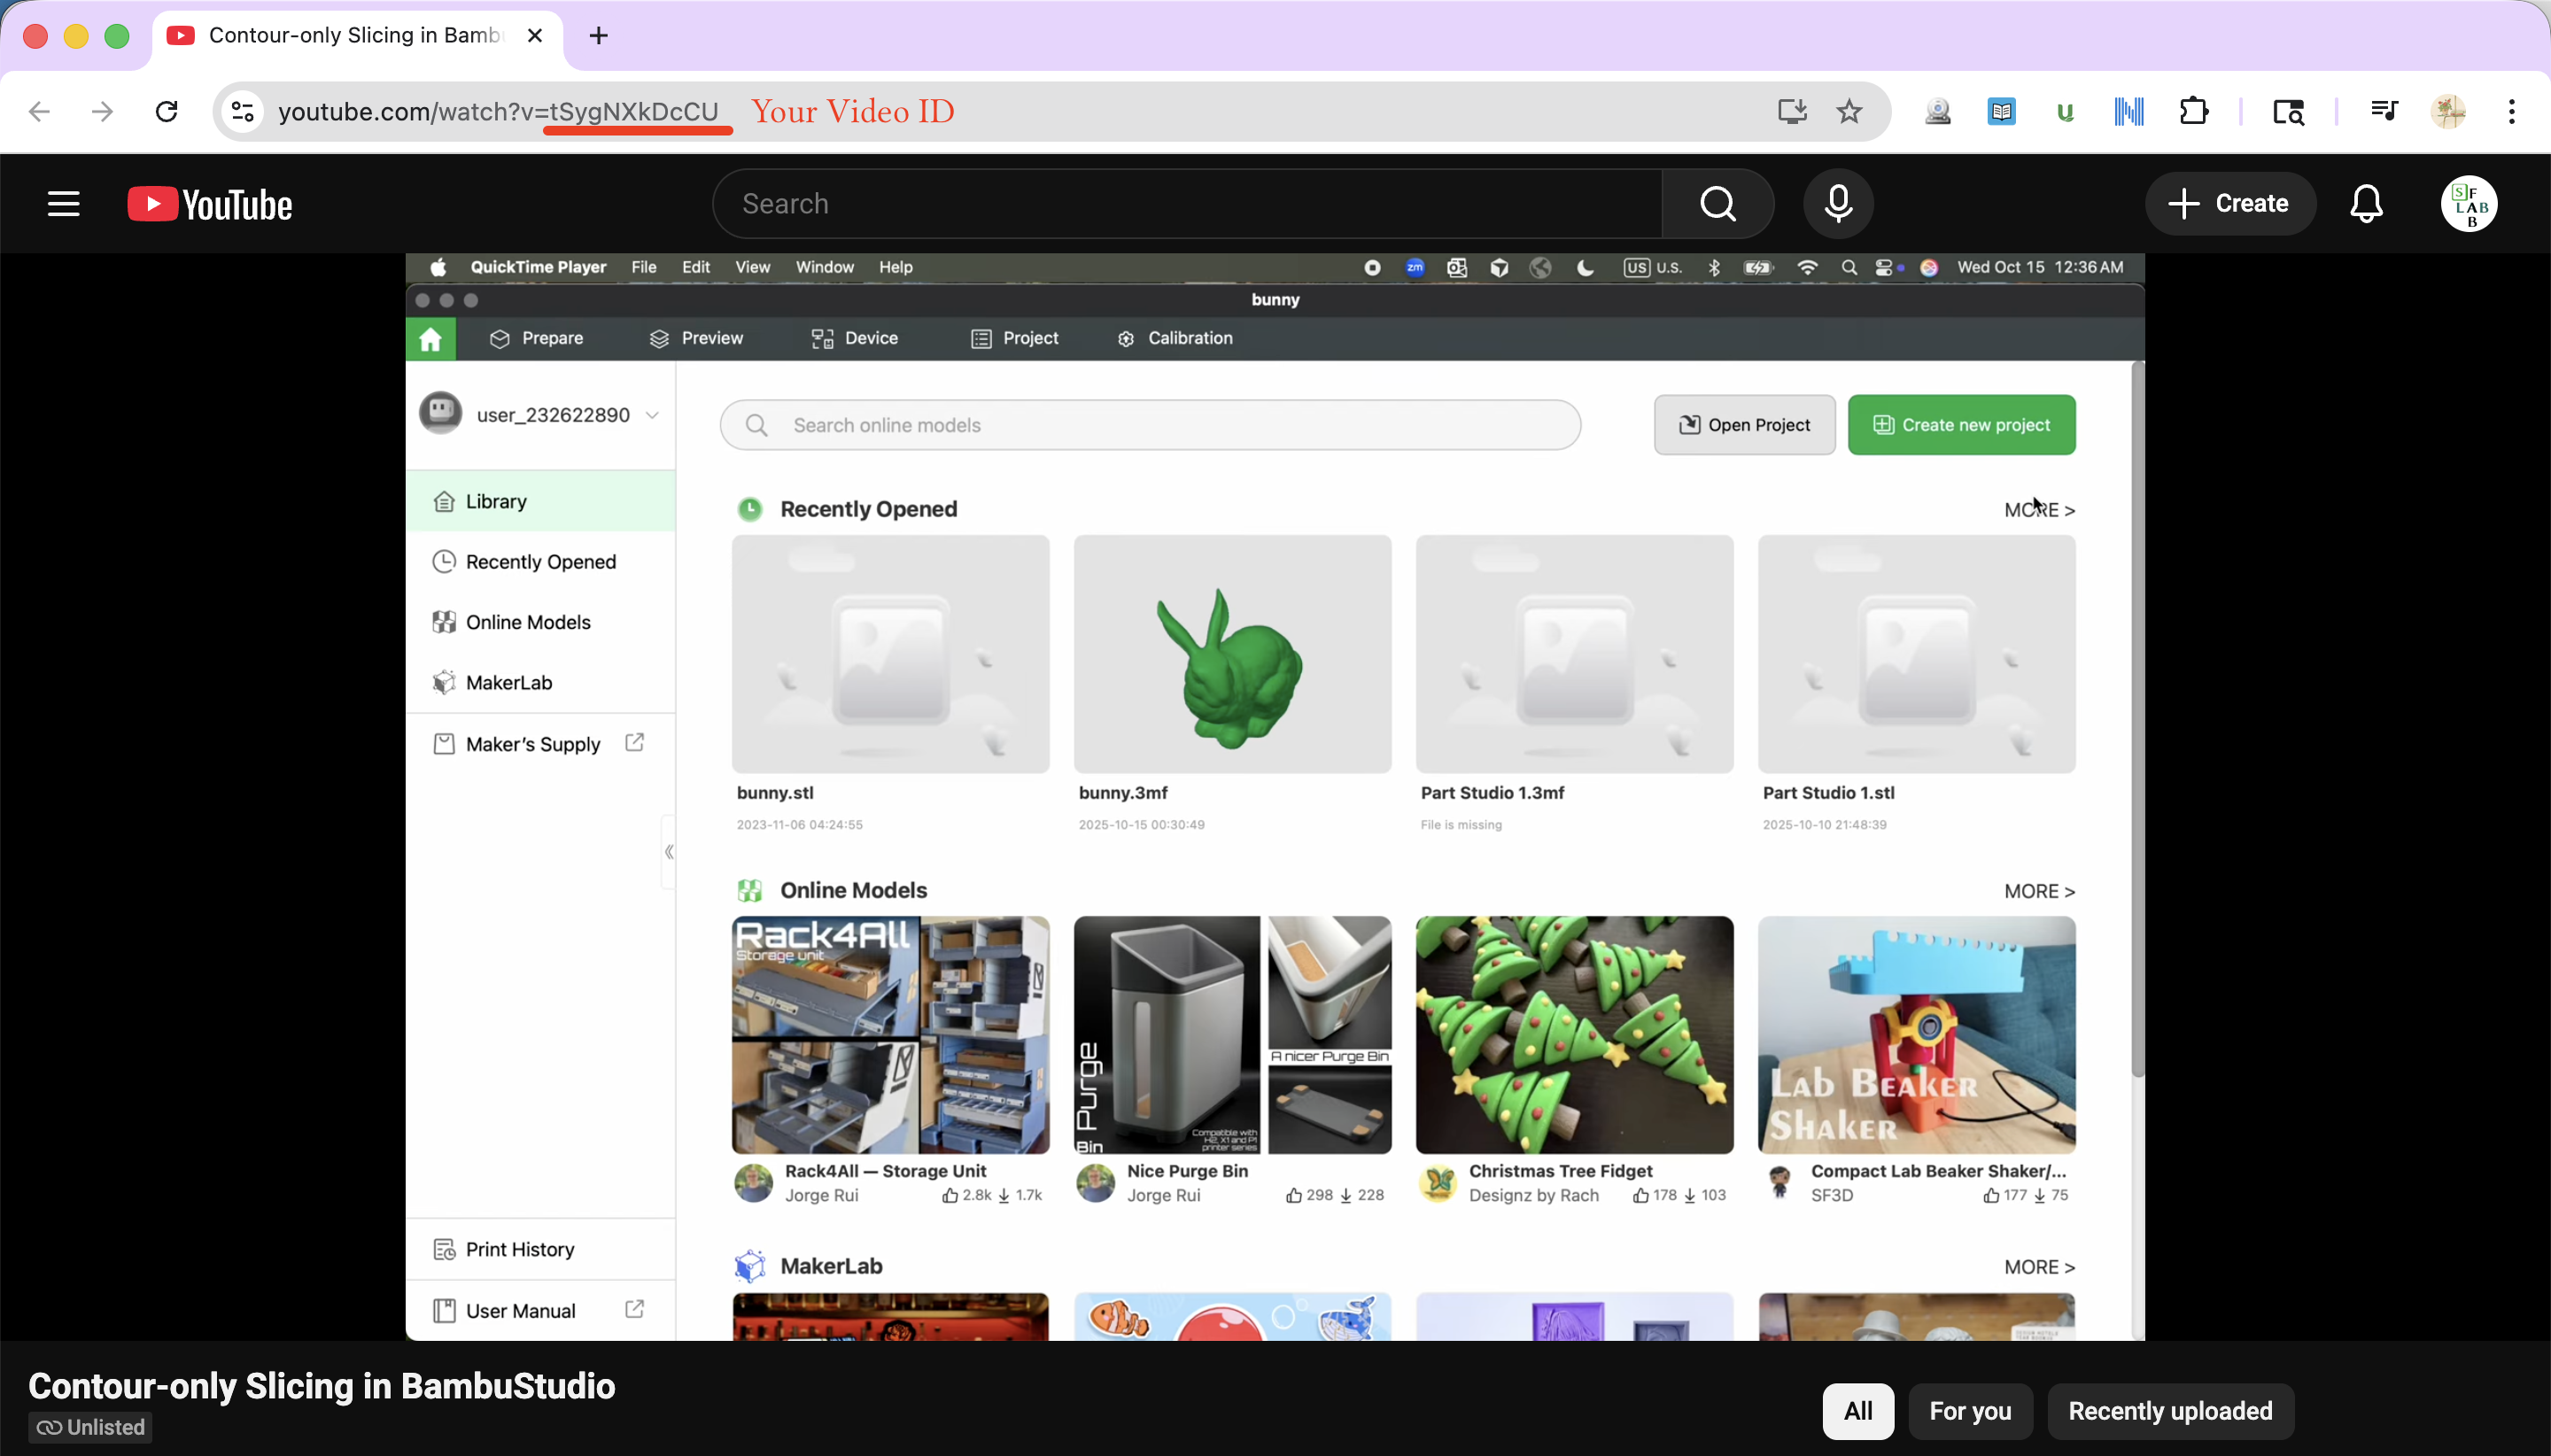
YouTube URL bar with the video ID portion highlighted
3
Replace the video ID in portfolio.html. Find the <iframe> lines for videos and paste in your own video ID:
portfolio.html — video embed (replace the ID only) <iframe src="https://www.youtube-nocookie.com/embed/tSYgNXkDcCU" width="560" height="315" title="YouTube video player" frameborder="0" allow="accelerometer; autoplay; clipboard-write; encrypted-media; gyroscope; picture-in-picture" allowfullscreen> </iframe> <!-- Just swap tSygNXkDcCU with YOUR video's ID -->

To add a second video, copy the entire <iframe>...</iframe> block and paste it below, then change the video ID. To remove a video, delete the entire <iframe>...</iframe> block.

💡
Preview locally: Save your file and open portfolio.html in a browser by double-clicking it. Your images will appear but YouTube videos may not play locally — they'll work once you publish to GitHub Pages.
6
Create a GitHub Repository and Upload Your Files

Now you'll create a new repository (think of it as a project folder) on GitHub and upload your edited files.
a
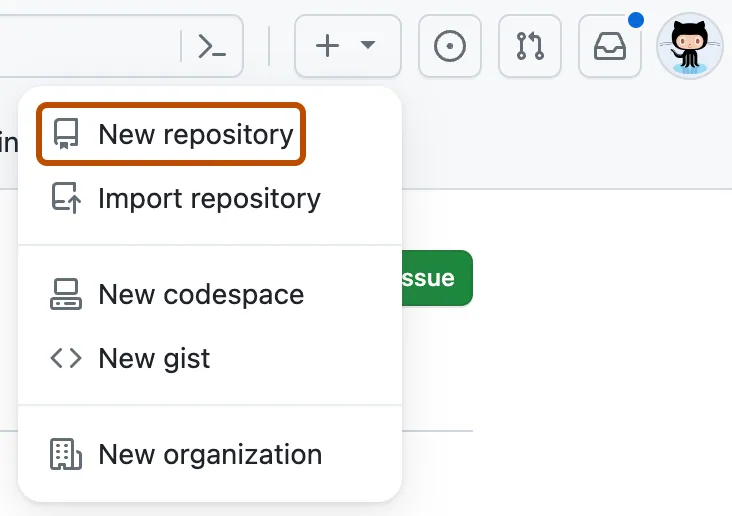
Log in to GitHub and go to your dashboard at github.com. Click the "+" icon in the top-right corner, then select "New repository".
GitHub
b
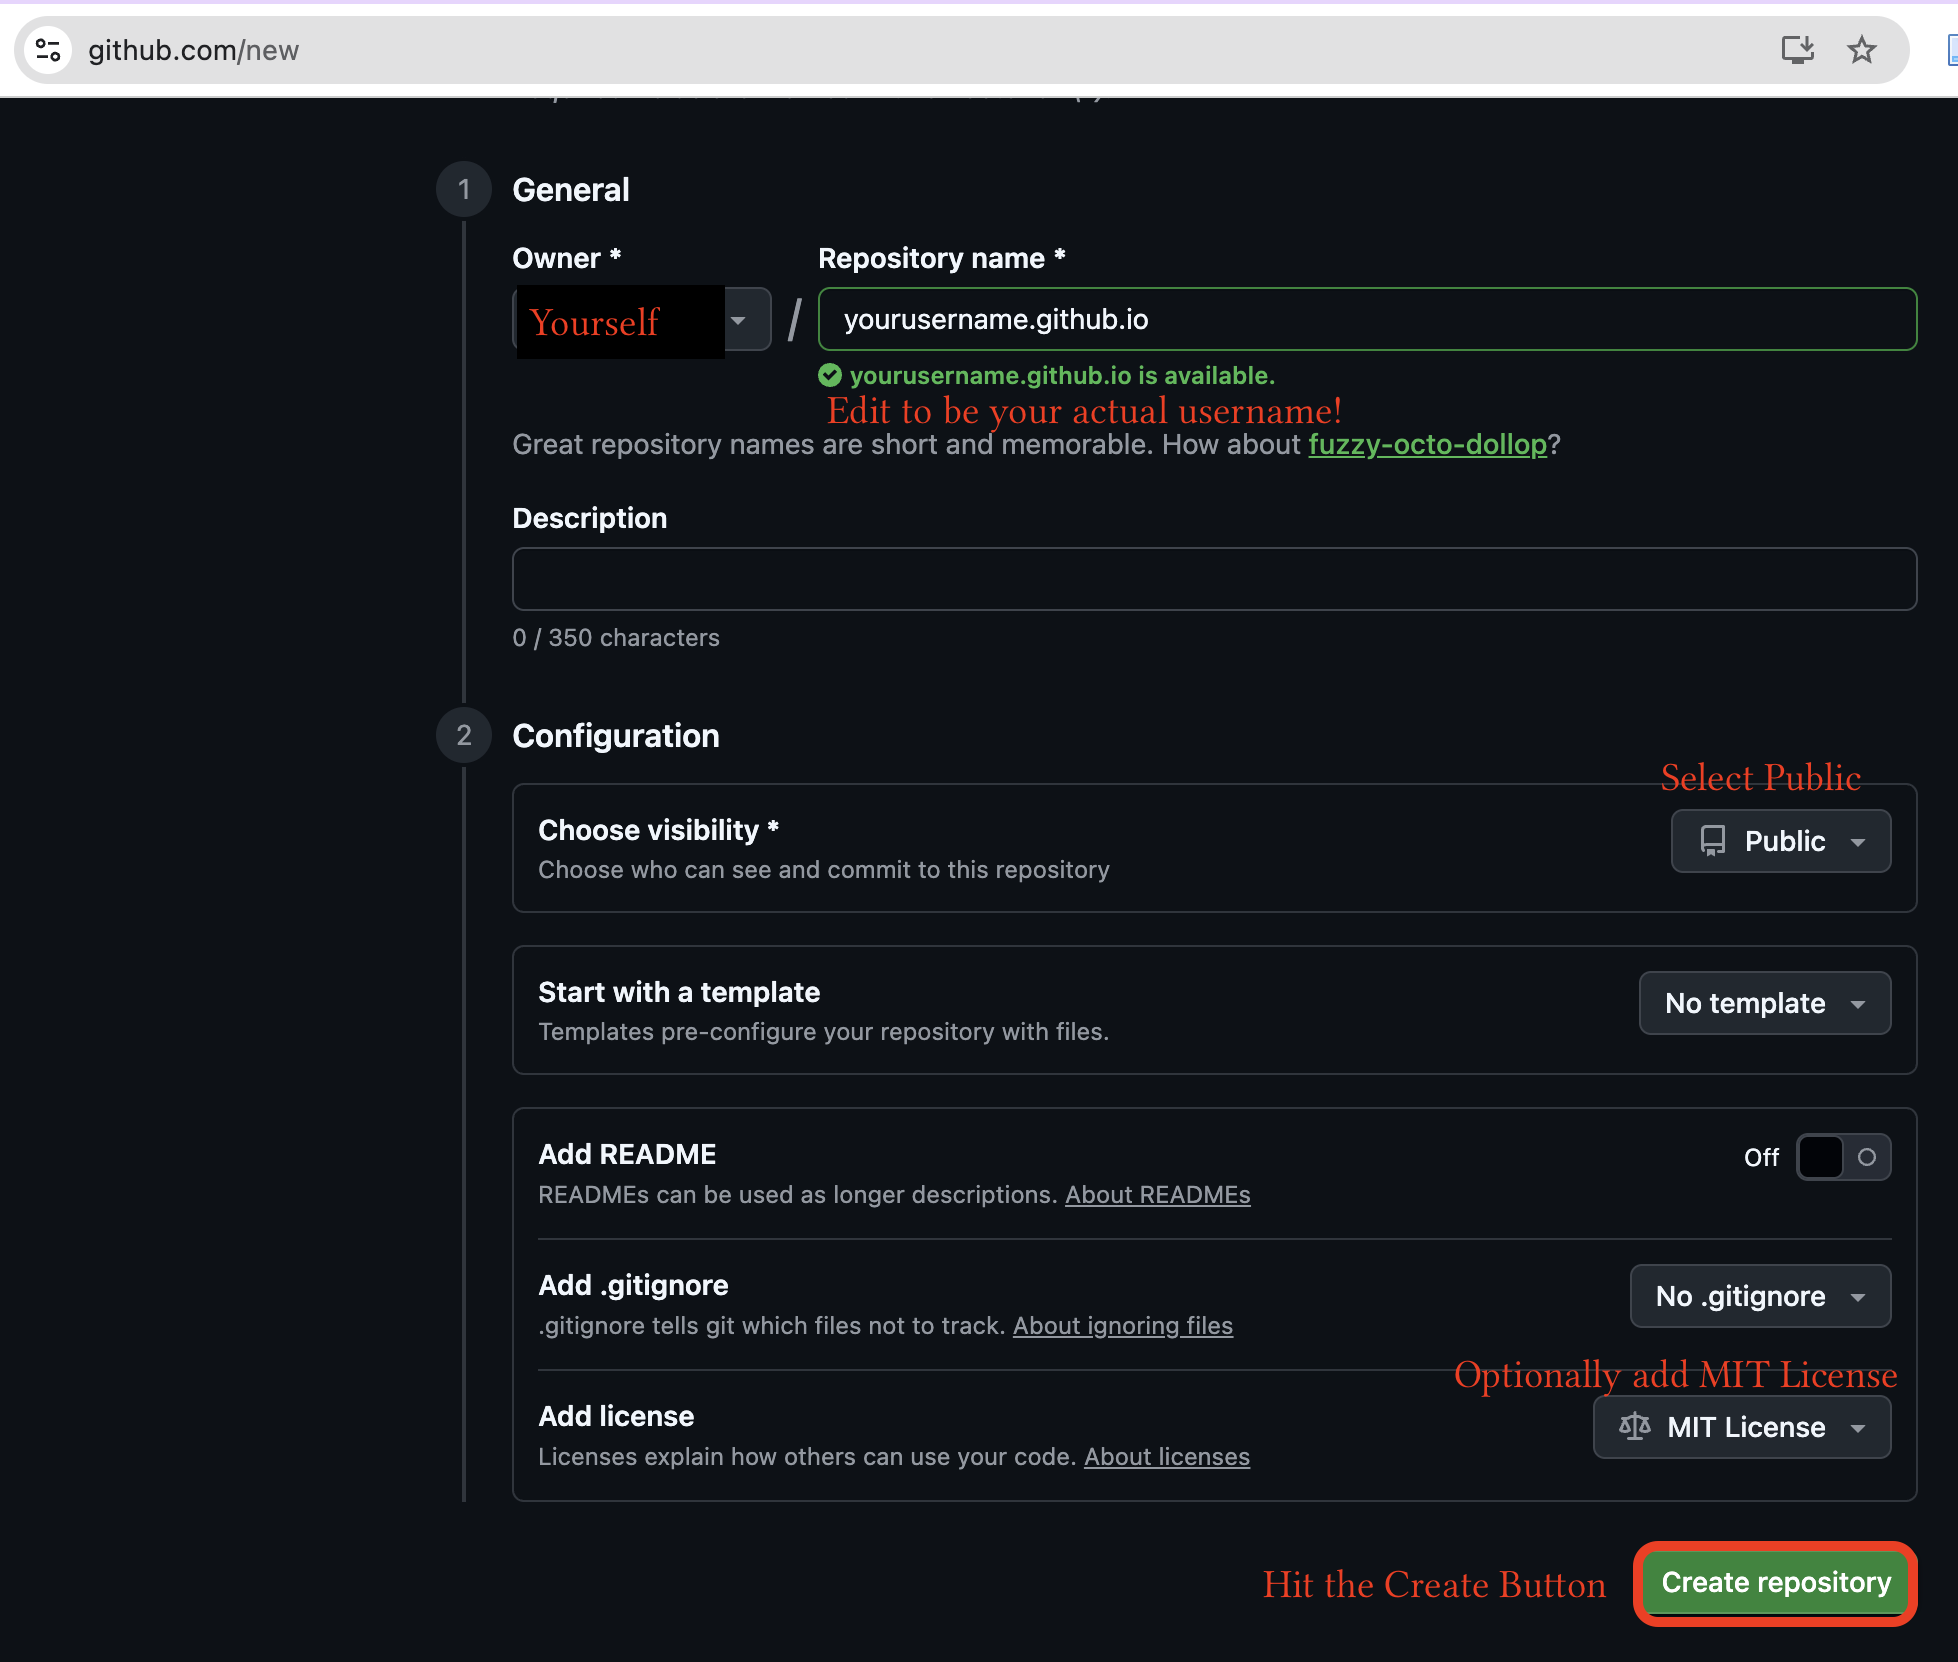
Name your repository. For the repository name, enter exactly: yourusername.github.io — replacing yourusername with your actual GitHub username. For example, if your username is janedoe, name it janedoe.github.io.

This special naming format tells GitHub to host it as a website automatically.
⚠️
Important: The repository name must be yourusername.github.io (all lowercase, matching your username exactly) for the free GitHub Pages hosting to work with a clean URL.
c
Set the repository to "Public" (GitHub Pages requires a public repository on free accounts). Leave all other settings as defaults. Click "Create repository".
The 'Create a new repository' page with the repository name field filled in as 'yourusername.github.io', the 'Public' option selected, and the 'Create repository' button highlighted.
d
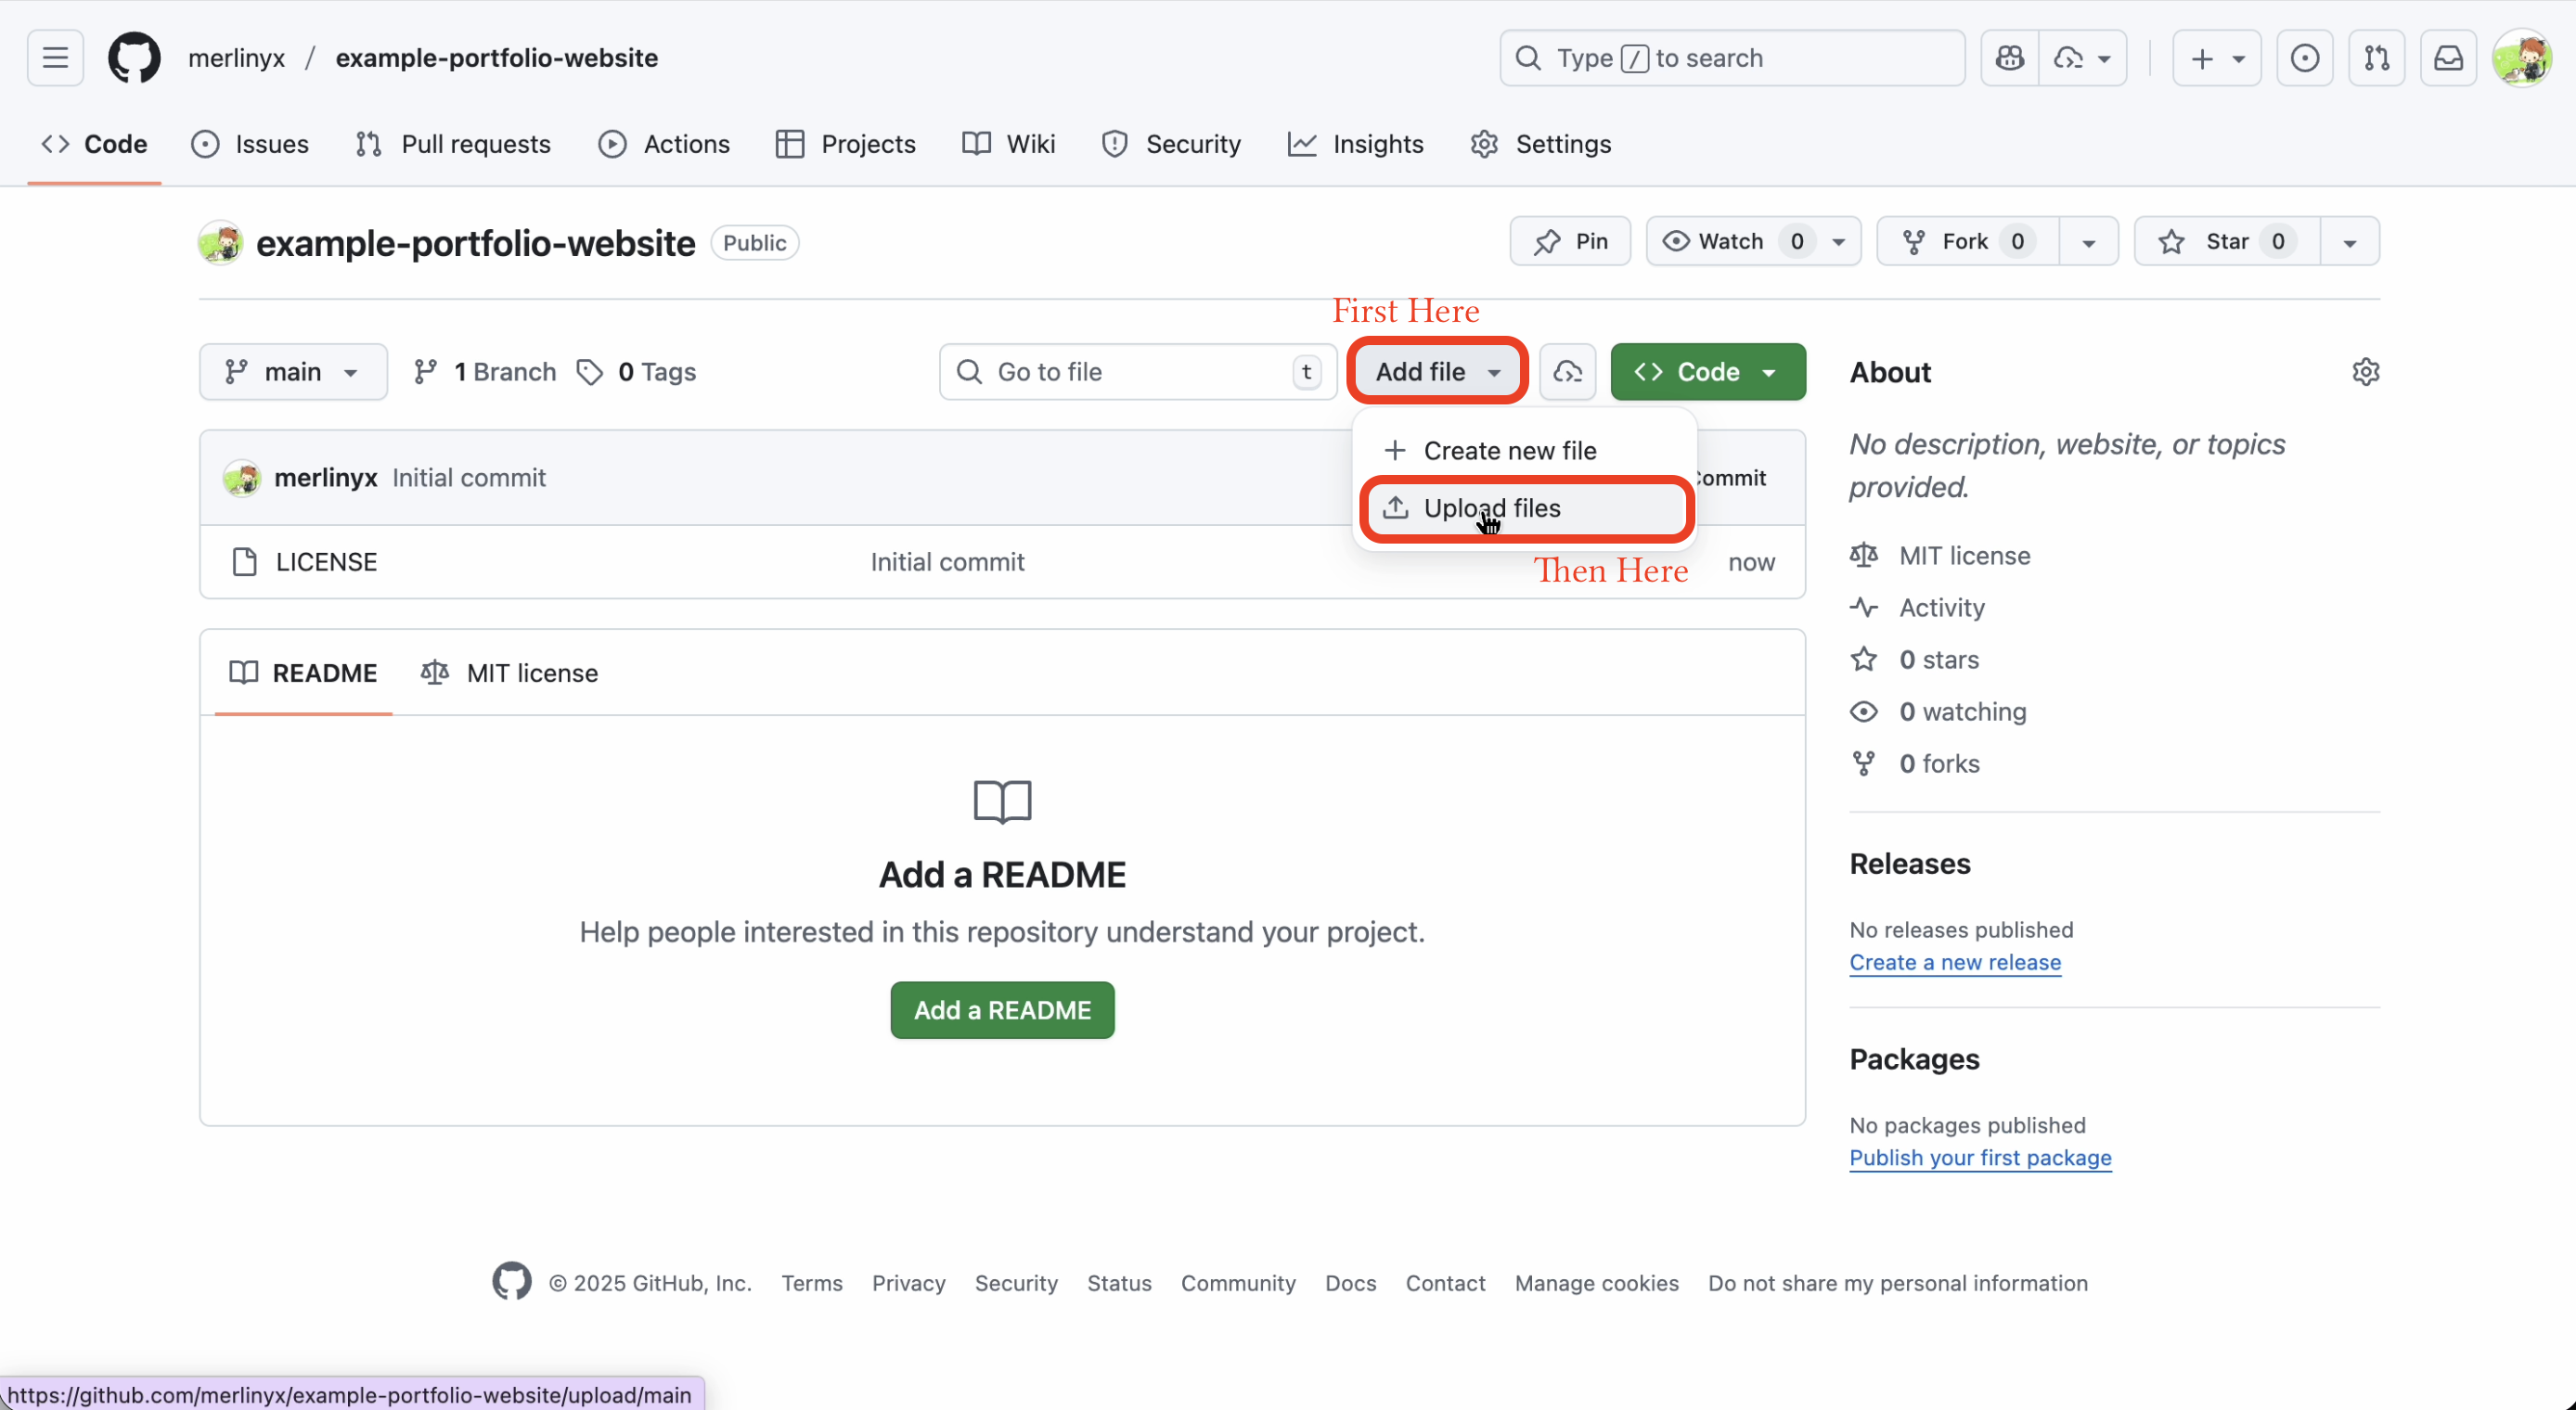
Upload your files. On the new (empty) repository page, click "uploading an existing file" (you'll see this link in the center of the page).
The new repository page with the Upload Files button highlighted.
e
Drag and drop your folder contents. Open your my-portfolio folder on your computer. Select ALL the files and folders inside it (press Cmd+A on Mac or Ctrl+A on Windows), then drag them into the upload area on GitHub.

Do NOT drag the folder itself — drag the contents (index.html, portfolio.html, css/, images/, files/). GitHub will preserve the folder structure.
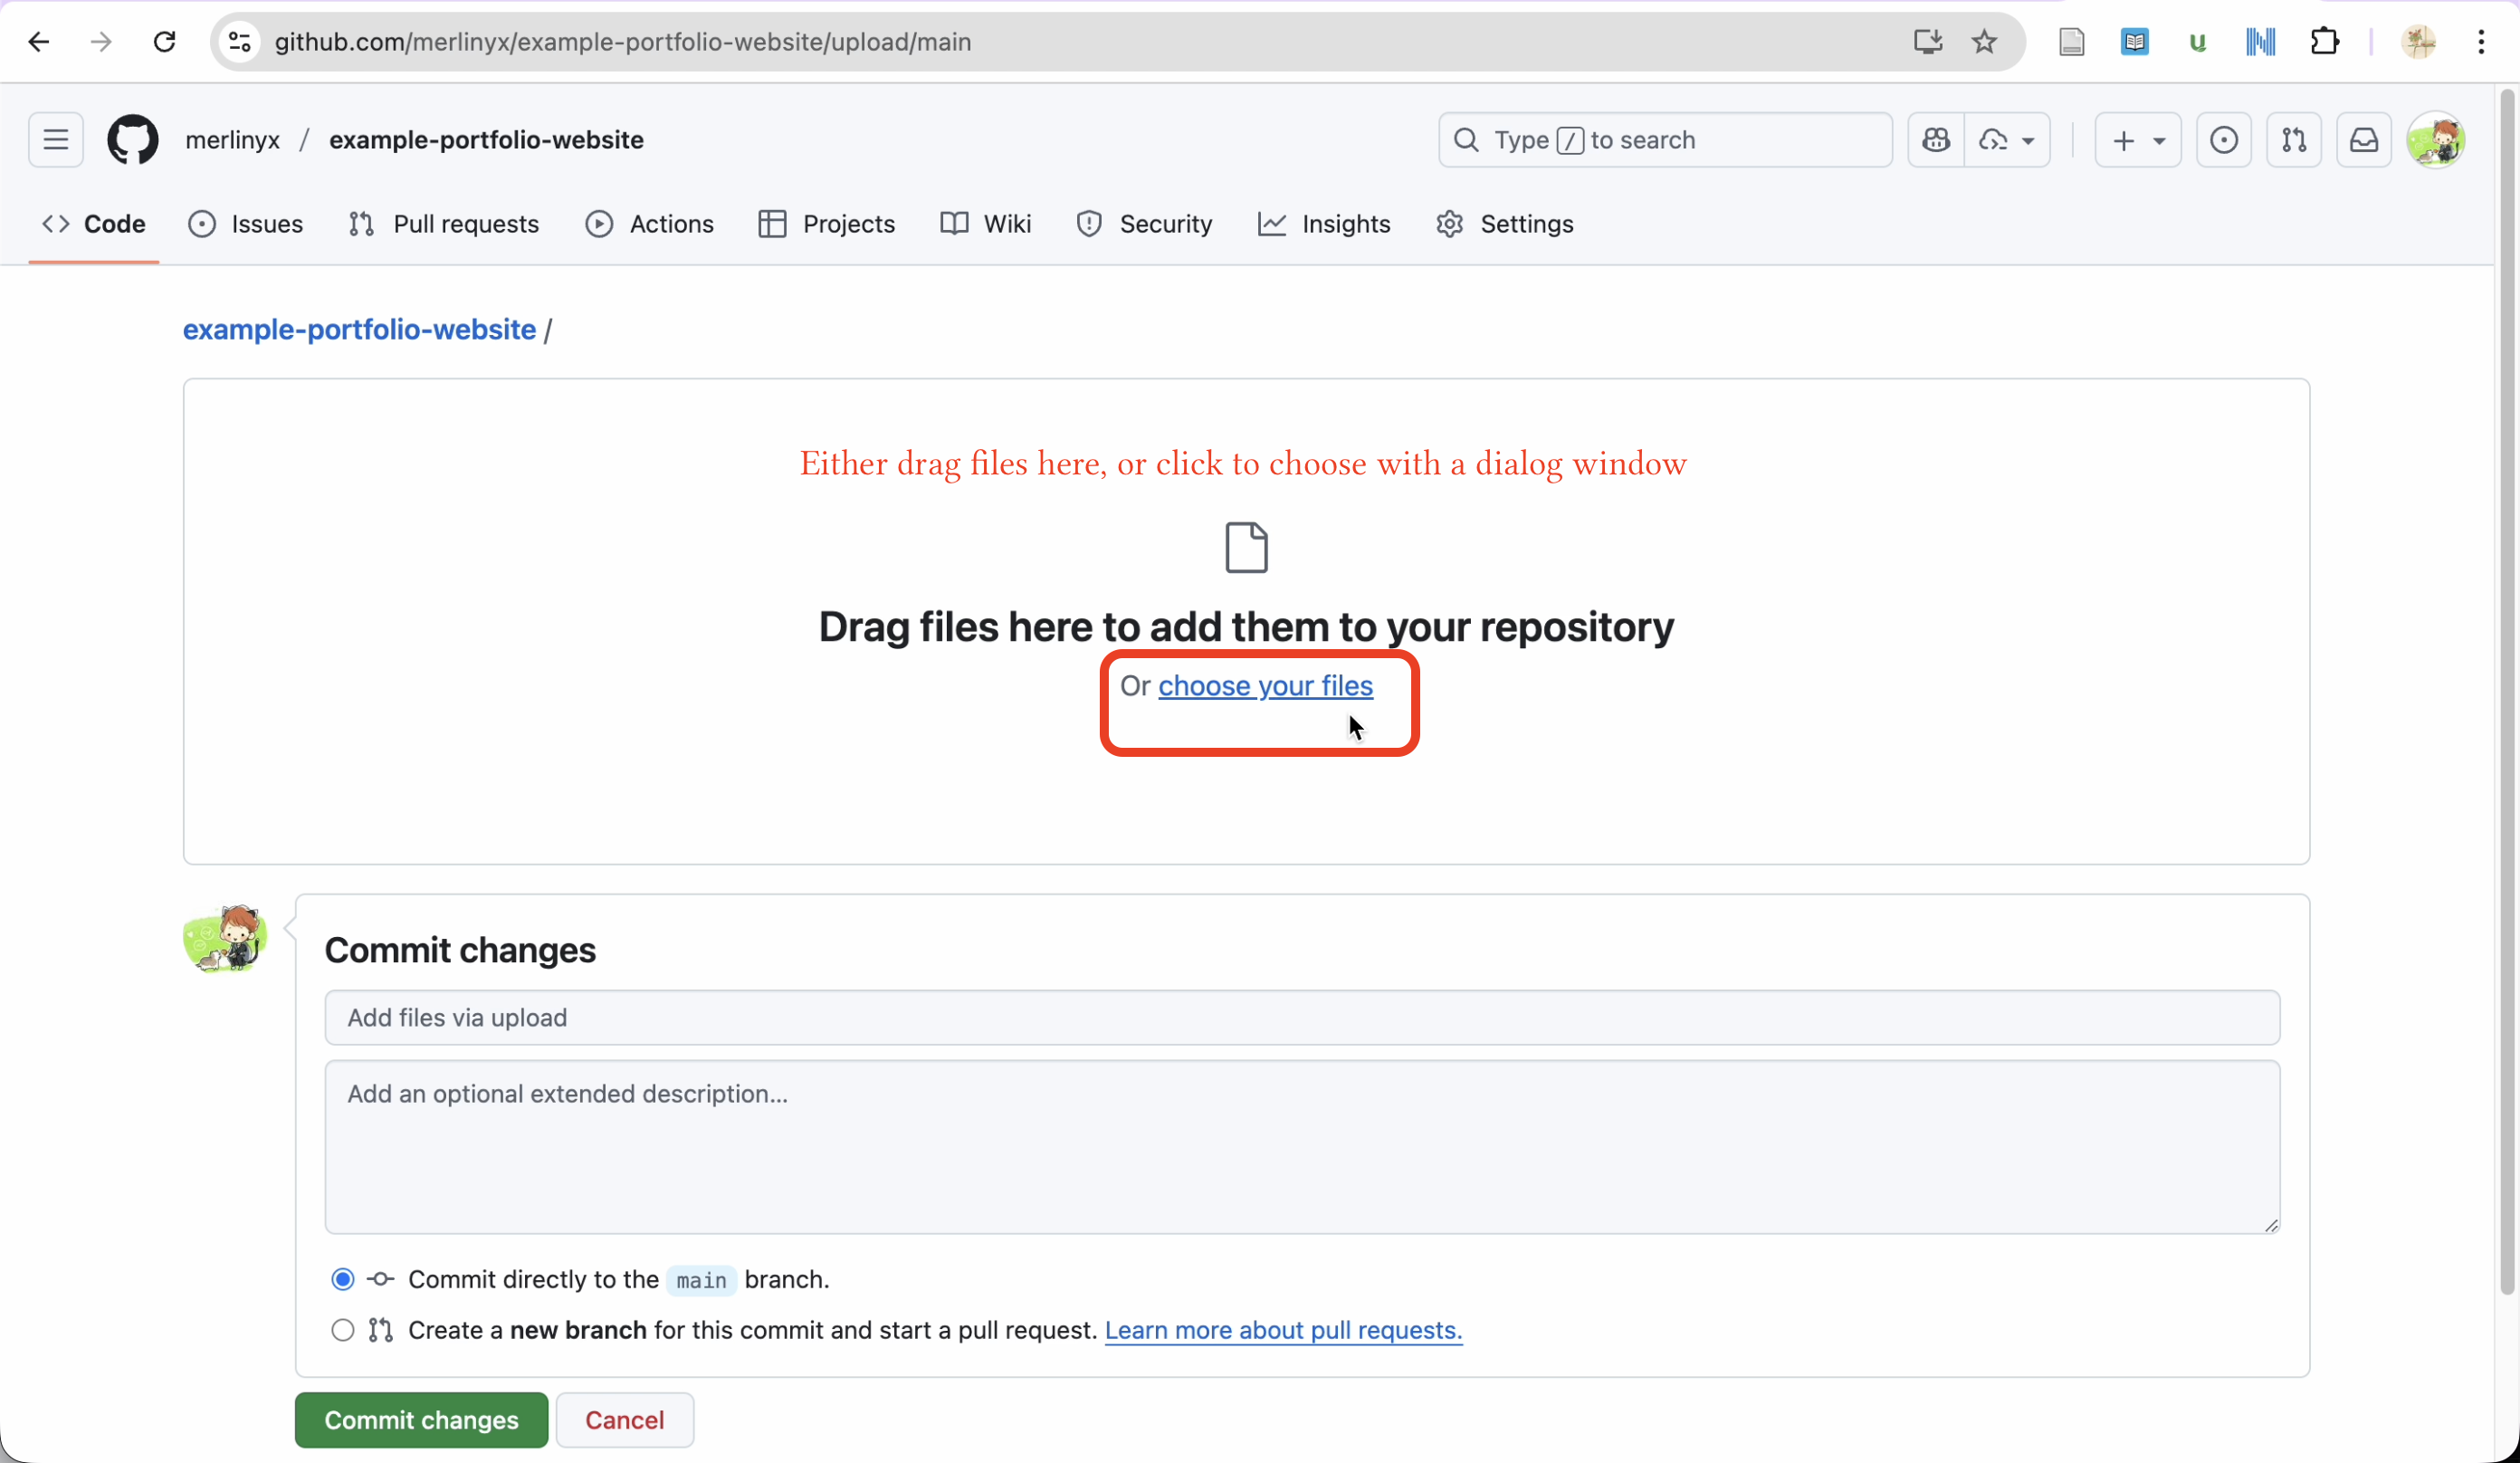
The upload page with a large dashed drop zone that says 'Drag files here to add them to your repository', and a list of uploaded files appearing below it.
f
Commit (save) your files. Scroll down to the "Commit changes" section. Leave the default message as-is (or write something like "Add portfolio website files"). Click the green "Commit changes" button.
💡
Wait for the upload to finish before clicking commit — you'll see a progress indicator while files are uploading. Large image files may take a minute.

After committing, you'll see all your files listed in the repository. 🎉

7
Turn On GitHub Pages (Free Hosting)

Because you named your repository yourusername.github.io, GitHub Pages is automatically enabled. Your site should already be live! Let's verify and find your URL.

You can also follow github's official guide here.
a
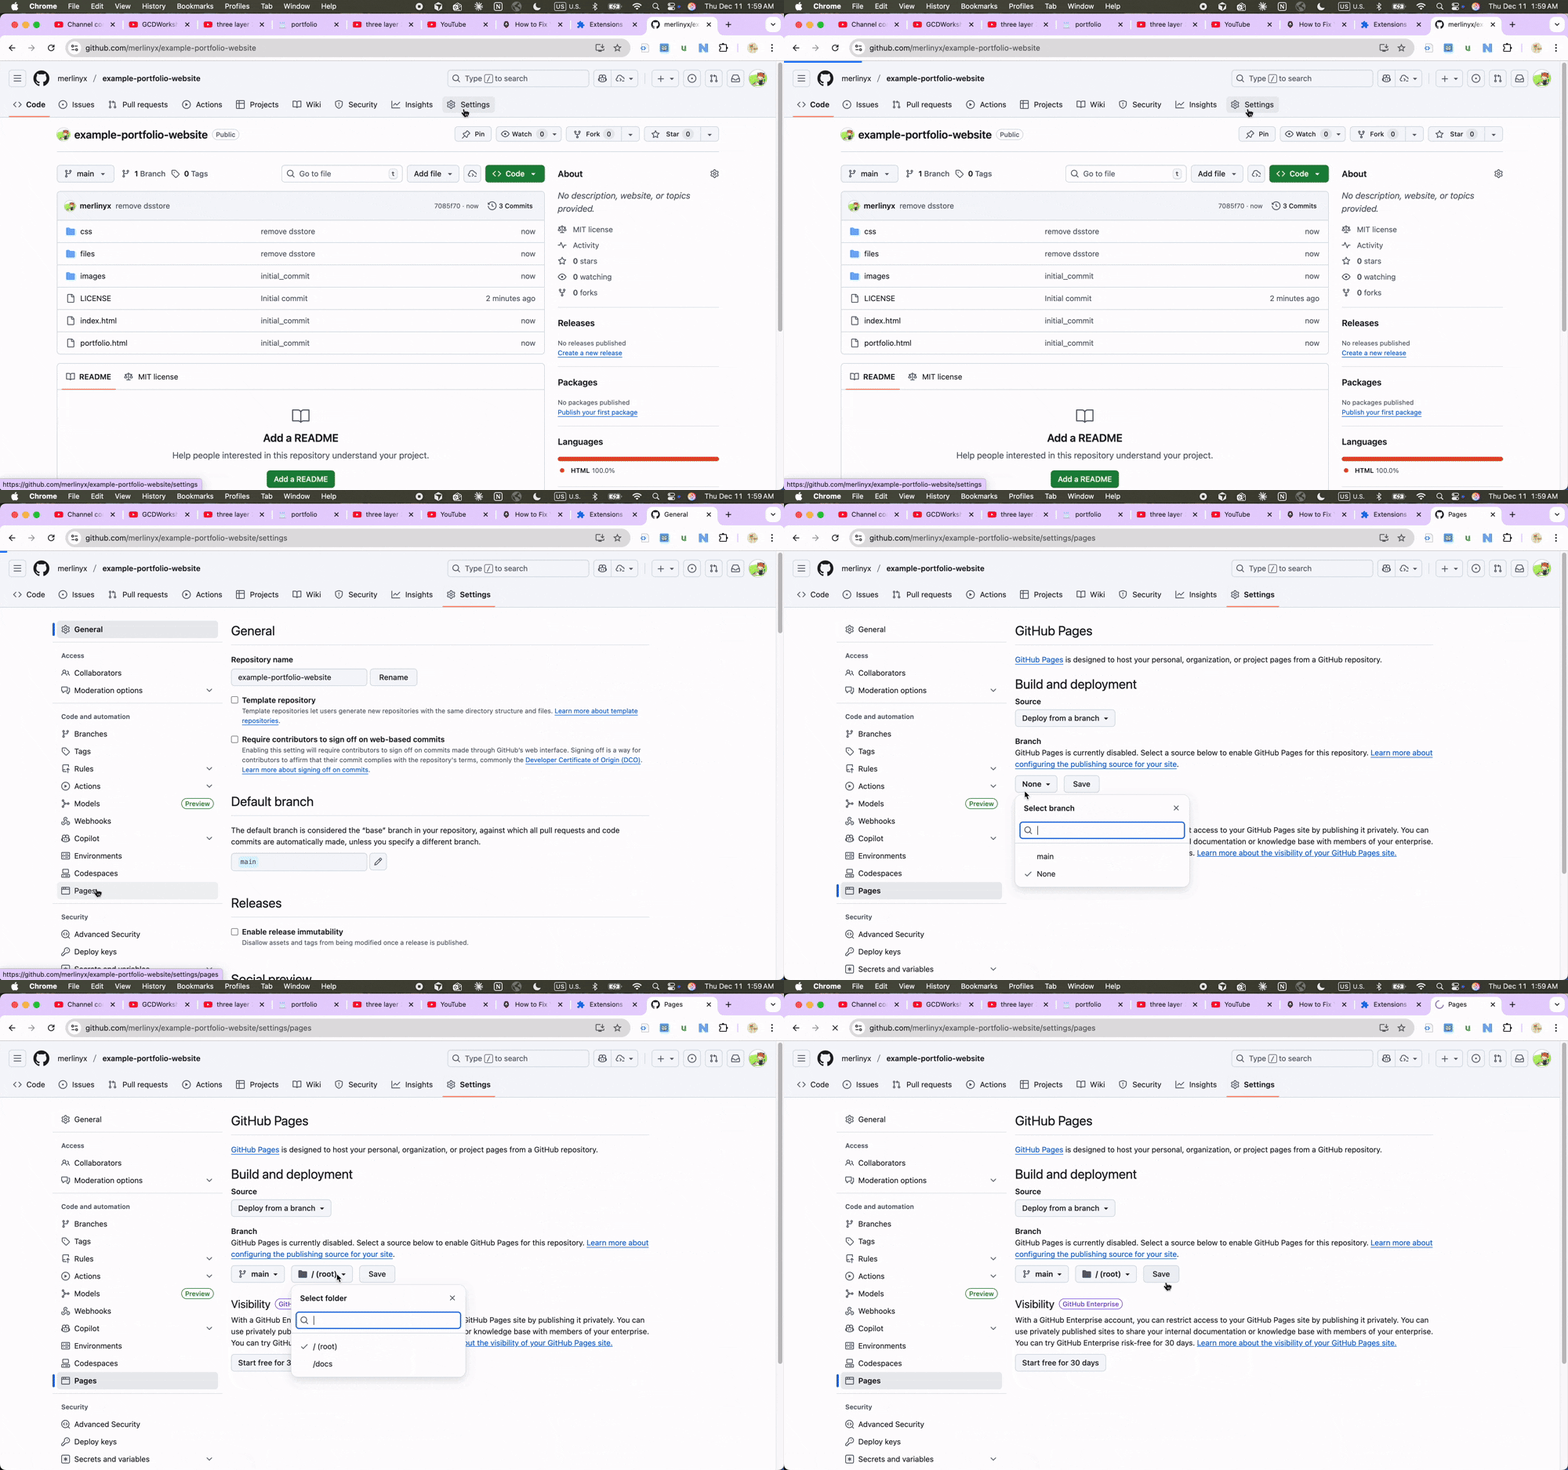
Go to your repository's Settings. Click the "Settings" tab at the top of your repository page (it has a gear icon).
b
Click "Pages" in the left sidebar (under the "Code and automation" section).
c
Make sure the source branch is set correctly. On the Pages settings page, under "Build and deployment" → "Source", make sure it is set to "Deploy from a branch" and the branch is "main" (or "master"). If not, set it and click Save.
The Settings page with the left sidebar showing 'Pages' highlighted. The main area shows 'GitHub Pages' with a green checkmark and the message 'Your site is live at https://yourusername.github.io/'
d
Confirm your site is live. You should see a green banner that says: "Your site is live at https://yourusername.github.io/". Click that link to visit your site!
It may take 1–2 minutes for your site to go live after your first upload. If you see a 404 error, wait a minute and refresh the page.
💡
Updating your site: Whenever you make changes to your files and want to update your live site, just go to your repository on GitHub, click "Add file" → "Upload files", and re-upload the changed files. Your site will update automatically within a minute or two.
🎉

Your portfolio is live!

Share your new website with the world at https://yourusername.github.io. You can continue to update it anytime by uploading new files to your repository.

?
Tips & Troubleshooting
🖼
Images not showing up? Double-check that: (1) the image file is inside the images/ folder, (2) the file name in your HTML matches exactly (including capitalization), and (3) the file has been uploaded to GitHub.
🎬
Videos not playing? Make sure you copied only the video ID from the YouTube URL (the part after ?v=) and not the full URL. The embed URL in your HTML should look like https://www.youtube-nocookie.com/embed/YOUR_ID_HERE. Also, the local preview will run into error 153 due to it being a local file. After your site is live, the videos will play properly.
🌐
Site not loading? Make sure your repository is named exactly yourusername.github.io with your exact GitHub username (all lowercase). Also wait 2–3 minutes after uploading — it takes a moment for GitHub to deploy changes.
📱
The template is mobile-friendly — it uses a responsive CSS framework called Skeleton, so your site will automatically look good on phones and tablets too.
📂
Organizing multiple projects? You can create multiple sections in portfolio.html by copying an existing section block, changing the heading, and pointing to different images. Each section can represent a different project or course. Or you can even create multiple portfolio pages and organize the html files as portfolio1.html, portfolio2.html, etc. (of course more meaningful names).